Sundry Cash Payment
Sundry Cash Payment
Bank Account to be Debited
-
Bank Account: Select from the drop-down list the most frequently used bank account for this transaction.
To set up a default (most frequently used) bank account:
-
Account Number: After you have selected the bank account in the above field, the bank account number appears in this field.
-
Currency: The currency appears according to which bank account you choose.
-
Balances: The account balance appears according to what is in your bank accounts.
-
Send Transfers to Bank: Select this option to show a record of current electronic transfers from the bank account selected in the above field. The 'Electronic Transfers from Bank Account' screen appears as below: See Electronic Funds Transfer
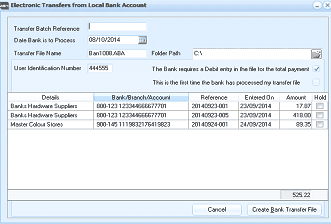 Image Description
The Electronic Transfers from Local Bank Account dialog. Fields include Transfer Batch Reference, Date Bank is to Process (08/10/2014), Transfer File Name (BM1008ABA), Folder Path (C:), and User Identification Number (444555). Checkboxes for bank Debit entry requirement and first-time transfer processing. The main grid lists supplier entries with Bank/Branch/Account numbers, References, Entered On dates, Amounts, and Hold status for Banks Hardware Suppliers (two entries) and Master Colour Stores. A total of 525.22 is shown. Cancel and Create Bank Transfer File buttons are at the bottom.
Electronic Transfers from Bank Account
Batch Listing The Batch Listing section provides you with a list of previous payment entries in list form. The Batch Total field updates with every payment entry. You can send this list to Excel by selecting the Send to Excel button on the menu bar.
-
Account Code: Enter the appropriate ledger account code here. Press F3 or click the button to select an account code from the ledger list. See Adding A Ledger Account for details on how to set up a ledger account.
-
Account Title: The account title appears when you enter the account code in the previous field.
-
Date: Enter the date on which the payment is made. This field is set to today's date by default. Press F3 or click the button to the right of the field to check the calendar.
-
Description: The description (i.e. Payment) appears on the ledger account history.
-
GST/VAT Category: By default, this box is set at 10% GST or VAT, indicating that the payment is subject to Tax of 10%. To change the GST or VAT category, select an alternative entry from the drop-down list. To set up a new Tax category, see Setting up a Tax Category.
-
GST/VAT is included: By default, this box is checked, indicating that the payment is subject to Tax. If this is not the case, uncheck the box.
-
Amount Inc. GST: Enter here the total amount paid including GST or VAT. Press F3 or click the calculator button to the right of the field to calculate the amount.
-
GST/VAT Amount: Enter the GST or VAT amount here.
-
Amount Ex. GST/VAT: The balance after GST or VAT (if any) appears here. Click 'Account Split' to divide the amount paid between multiple accounts and sub-accounts.
-
Paid By: Enter the method of payment here by selecting either Transfer, Cheque, Credit Card, or Cash. If payment is by transfer, a reference number must be entered; if payment is by cheque, a cheque number must be entered; if payment is by credit card, the card and authorisation details must be entered; and if payment is by cash, a receipt number must be entered. These fields automatically appears after you have selected the method of payment. Note: If the method of payment is Cash, then an option will appear allowing you to specify if that cash payment is to be deducted from cash on hand (reduced from the amount to be deposited to the bank), or is from other cash available.