Scanning and Attachments
You can add attachments to a customer, suppliers, products, ledger accounts or jobs.
To add an attachment select the Customer, Supplier, Product, Ledger Account or Job and select Attachments at the right hand side of the screen.

ABM Customer Account screen showing the "Open Customer 001 - Brightstone Playschools Ltd" window. The top toolbar displays action icons including Save, Copy, Paste, Print, Send To, Delete, and an Attachments button (highlighted). Below is the Account Details area with tabs for General Details, Cash Control, and others. Visible fields include Customer Name, Account Code, Category, Customer Group, Tax Status, Account Manager, Credit Limit, and Sales Analysis fields. The right side shows a Cash Control section with Balance, Orders, and Payment Clearance fields. An "Attachments" button is visible in the toolbar area at the top right.
Attachments: You can add attachments by dragging the document on to the the screen or by selecting Browse Link or Browse Store or by scanning the document and storing the information against the account.
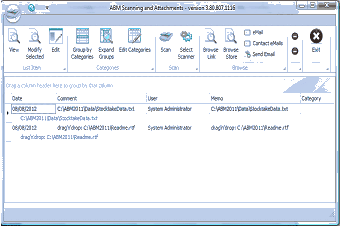
ABM Scanning and Attachments window (version 3.80.807.1116). The toolbar shows buttons for View, Modify, Edit, Group by Categories, Expand Groups, Edit Categories, Scan, Select Scanner, Browse (Link and Store), Contact eMail, and Send Email, along with a Delete button. Below is a grid listing attachments with columns for Date, Comment, file path (e.g., "C:\ABM2011\Data\StocktakeData.txt"), User (showing "System Administrator"), Memo, and Category. The area at the top states "Drag a file/folder here to copy/link. Enter Ctrl+V to paste." Several file attachments are listed with dates and file paths.
Drag and Drop: By selecting any document such as a Word Document, PDF etc, you can drag the document onto the attachment screen.
Browse : You can select Browse and Link, and select the file from a folder and set a link to this file. Alternatively you can select Browse and Store which will store the document details in the database. The advantage of using Browse Store is that if the document is deleted accidentally its contents can still be displayed.
eMail: You can select the e-Mail option to browse your e-mail folders, and select an e-mail to add to the list of documents. When you select e-Mail you will be presented with a tree option of your Outlook folders on the left hand side. You can select a particular folder to browse for the required email.
Contact eMails: You can select this option to browse you email folders for any emails relating to the email addresses that are contained in the contacts folder. This will scan both your Inbox and Sent folders. Once the list of emails are displayed, you can select an email or emails to attach to the account.
Send Email: You can select an attachment, and select Send Email to email that attachment. This will open an email in Outlook and you can then enter the email address of the recipient.
View: In order to view the document, select that document and select View.
Delete: You can select a document to delete by selecting the first on the top right hand side of the screen, or select Delete All documents by selecting the second on the top right hand side of the screen.
**Scanning: **If you have a scanner you can scan documents such as signed delivery documents by selecting Scan.
- Select Scanner: before you can scan any document you must select the scanner to use. If you select "Select Scanner" this this will list any scanners you have available (if any). Once the list appears select the appropriate scanner.
- Scan: Once the scanner is selected you can scan any document and attach that document to the account for further retrieval.
**Categories: **You can add a categories which can be used to group the attachments according to your preference.
- Add Categories: To add a category select Edit Categories and select Add.
- Assigning Categories to attachments: Once you have added categories you can assign these to the individual attachments by selecting Edit and selecting a category from the drop down list.
- Grouping By Categories: You can select Group by Categories and all like attachments will be grouped together. You can expand the group by selecting that group or by selecting Expand Groups.