Generating a Cash Payment
Generating a Cash Payment
Payments from this section can be entered against suppliers, customers (refund), ledger and jobs. This option will be used for continuous entry of payments.
To view details on generating a once off payment see Generating a Purchase Payment.
To generate a Payment:
- Select Cashbook in the folders list (left of screen) and a list of sub-categories will appear:
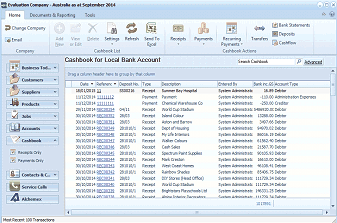
The ABM main screen showing the Cashbook for Local Bank Account. The left navigation panel displays folders including Business Info, Customers, Sales Quotes, Delivery & Returns, Suppliers, Products, Accounts, Cashbook (selected), Contacts & C., Service Calls, and Addresses. The main area shows a list of cashbook transactions with columns for Date, Reference, Type, Payee, User, and Account details. The toolbar at top includes buttons for Receipts, Payments, Recurring, Transfers, Deposits, and Bank Statements. The Payments button is highlighted in the toolbar.
List of current Cashbook Receipts and Payments
-
A list of existing payments and receipts appears in the main screen.
-
Select Payments in the Cash Transactions menu bar (at top of screen) and a new Cash Payments screen appears:
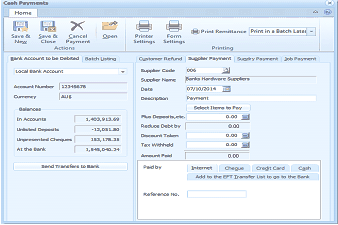
The Cash Payments screen showing the Customer Refund tab. The toolbar shows Save & New, Save & Close, Cancel Payment, and Open buttons, along with Print Remittance, Print in a Batch Later dropdown under Printing. Tabs visible include Customer Refund, Supplier Payment, Sundry Payment, and Job Payment. The left section shows the Bank Account to be Debited as Local Bank Account, with Account Number (123456678), Balance (AUS), and financial details including In Accounts, Unlisted Deposits, Unpresented Cheques, and At the Bank amounts. The right section shows payment fields including Supplier Name (Banks Hardware Suppliers), Date (07/10/2014), Description, Select Items to Pay, Plus Deposits, Reduce Debt by, Discount Taken, Tax Withheld, and Amount Paid (all 0.00). Payment method options include Interest, Cheque, Credit Card, and Cash. A "Send Transfers to Bank" button and Reference No field are at the bottom.
New Cash Payment
-
To make a payment, select the appropriate tab and enter the required details. See Generating a Purchase Payment, Supplier Payment, Job Payment, Customer Refund
-
Send Transfer to Bank: If you wish to send a file to bank containing the payments you wish to pay electronically then select the button "Send Transfers to Bank" see Electronic Funds Transfer
-
Printing: If you wish to print remittances or cheques, select Printing from the Cash Payments toolbar and Print Now or Print Later. If you are using pre printed cheque stationery and wish to change the form or printing options, select Documents and Printing and then select Printing and Form Settings. Select Supplier Remittance/Cheque from the drop-down list and select the form you wish to use. When you have selected this form you will have the option of entering the number of line items to be printed on the remittance.
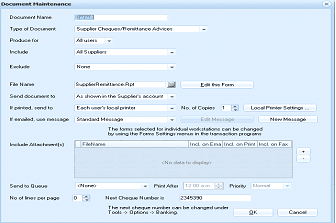
The Document Maintenance dialog box for configuring form settings. Fields shown include Document Name, Type of Document (Supplier Cheques/Remittance Advices), Produce For (All Users), Include (All Suppliers), Exclude (None), File Name (SupplierRemittance.Rpt), and "Edit the Form" button. Additional fields include "Send document to" (As shown in the Supplier's account), "If printed, send to" (Each user's local printer), No. of Copies (1), and Local Printer Settings. Email options show "Standard Message" with a "New Message" button. At the bottom, checkboxes for "Include Attachment(s)" with options for Reference, Inst on Email, Inst on Print, Inst on Fax. Additional settings include Send to Queue checkbox, Print After option, Priority setting, No of lines per page field, and Next Cheque Number (2345390). A note indicates the next cheque number can be changed under Tools > Options > Banking.
Form Settings
The Cash Payments screen contains the following sections: