Setting up Product Accounts
Setting up Product Accounts
Before setting up a product account, ensure you have set up the appropriate product group for the account. See Setting up Product Groups for more details.
Setting up all product accounts at the beginning and having all details to hand (such as stock control for each product) will save time when posting transactions later. Editing products to add in extra information at a later date is extremely time-consuming.
Select Products in the Folders list (left of screen) and select New on the menu bar (at top of screen), and an Add New Product screen appears:
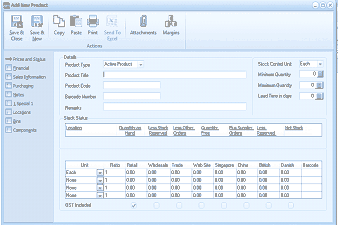
The "Add New Product" screen in ABM. The toolbar shows Save & Close, Save & New, Copy, Paste, Print, Send To, Attachments, and Margins buttons. The left navigation panel lists tabs: Prices and Status, Financial, Sales Information, Purchasing, Locations, Bins, and Components. The main "Details" section shows fields for: Product Type (set to "Active Product"), Stock Control Unit (set to "Each"), Product Title, Minimum Quantity, Product Code, Maximum Quantity, Barcode Number, and Lead Time in Days. Below is a "Stock Status" section with a "Locations" table showing columns: Quantities, On Hand, Back Orders, Free Stock, Stk Rqd, Quantities, Bin Numbers, Min, and Net Stock. Below that is a pricing grid with columns: Unit, Retail, Wholesale, Trade, Web Site, Singapore, China, Billrich, Danish, and Barcode, with rows for Each, Box, Dozen, and More. A "GST Included" checkbox appears at the bottom.
Add New Product
The Add New Product screen contains the following sections: