Company Menu Bar - Tools
Company Menu Bar - Tools
Tools
![]()
The ABM Tools menu ribbon showing the Documents & Reporting and Tools tabs. The Tools tab is active, displaying toolbar buttons including: Advanced Find, Database Check, Data Check, Send Data, Tax Periods, Branches, Scheduled (Tasks), Redirect, Import, Export, and Export Report. Each button has an icon above its label. This ribbon provides quick access to data management, import/export, and maintenance functions.
-
Import: Imports customers, suppliers, products, jobs and accounts data from external sources. Please refer to Importing and Exporting Existing Company Data.
-
Export: Exports customers, suppliers, products, jobs and accounts data to external sources. Please refer to Importing and Exporting Existing Company Data.
-
Backup this Company Data: You can backup an SQL database as required. When you select Backup you will be presented with the backup screen.
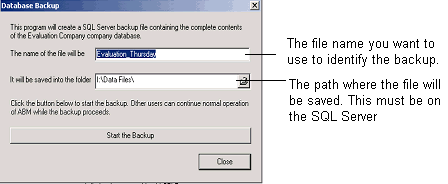 Image Description
The "Database Backup" dialog box. It displays the message "This program will create a SQL Server backup file containing the complete contents of the Evaluation Company company database." Below are two fields: "The name of the file will be" (showing "Evaluation_Thunder" as the backup file name) and "It will be saved into the folder" (showing a file path with a browse button). Annotations on the right explain: "The file name you want to use to identify the backup" and "The path where the file will be saved. This must be on the SQL Server." At the bottom are two buttons: "Start the Backup" and "Close".
-
Advanced Find:
The advanced find allows you to search on Customers, Suppliers, Products, Jobs and Ledger Accounts. You can search on both records and transactions. The search will search all fields in the appropriate records or transactions.
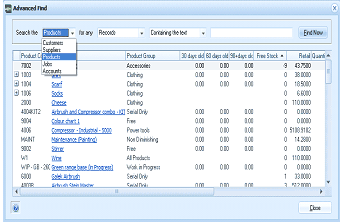
The "Advanced Find" dialog box. At the top are three dropdown fields: "Search the" (set to "Products"), "for any" (set to "Records"), and a search type selector (set to "Containing the text") with a text input field, and a "Find Now" button. The results grid below displays a list of matching product records with columns: product code, description, Product Group, 30 days old, 60 days old, 90 days old, Free Stock, and Retail Quantity. Products listed include items like "Jnks" (Accessories), "Accountant" (Clothing), "SOOS" (Clothing), "Cheese" (unlabeled), "Airbrush Compressor combo_i31" (Craft/Diy), "Colour chart 1", various hardware and clothing items. Blue hyperlinks are visible on product descriptions for drill-down access. A "Close" button is at the bottom right.
-
Module to Search: Select the module you wish to search on from the drop-down list. Example Products.
-
For Any: There are two options available to search on which is Records or Transactions
-
Records: If you want to search details from the various records, you can select Records from the drop down list. Example: Select Products and search for anything on the products records that contain the word Green. This will return a list of every product that has the word Green in any field relating to that Product.
-
Transactions: You can search transactions for the particular module, which will search the text on any transaction header relating to that module. Example: If you are looking for a transaction with a customer order reference of ORD1234 then this will display all transactions with that reference such as Order, Delivery and Invoice. Another example of a search you could carry out, is if you wanted to find which Job you purchased say a Generator for. you could Select Jobs, select Transactions, and search containing Generator and this will list any transaction processed to a job for containing the description Generator.
-
Serial/Lot Numbers: If you select Products there is an extra search criteria for searching Serial or Lot tracked numbers.
-
Containing/Starts With/Net Value of/ With a Reference Starting With: You can decide to if you want your search criteria to search for the text contained in a description, or where the description starts with the selected text. You can also search for transactions where you are searching for a transaction of a particular value or search based on the transaction reference (such as invoice number).
-
View Details: To view the details of any line displayed click on the Blue highlighted link.
-
Customise: Please refer to the topic Customising Your Software.
-
Data Check: Select this option to check the database against the system setup.
-
Information Storage Fields and Indexes: Ensures the correct fields are included in the database tables, and resets any index required.
-
Ledger Account Balances: Recalculates all General Ledger balances.
-
Customer Aged Balances and Supplier Aged Balances: Re-establishes the balances based on the actual transactions due by those customers or suppliers, and updates the summary tables accordingly.
-
Check Work in Progress on each Job.: Re-calculates the value of Work in Progress for each Job based on the transactions processed, and updates the summary tables accordingly.
-
Status of all Sales Orders and Status of all Purchase Orders: Checks if orders have been completed or not and reset flags accordingly, and updates the Outstanding Customer Orders and Outstanding Supplier Orders screens.
-
Product Quantities: Recalculates stock levels from transaction data.
-
Check Customer and Supplier Graphs: Re-calculates the sales and purchases values and updates the Graphs.
-
Options: From the Options menu you can make the following changes:
-
Preferences: You can choose to display helpful hints. Check the box to highlight each section of the screen, so section names are more visible. To customise the appearance of customer, supplier lists, and so on, see Customising the ABM Interface. To personalise the look of ABM you can select a Skin to apply to all screens, see Personalising the ABM Interface.
-
Company: You can change the company details, such as name and tax numbers here. To change the company address select "Forms" then select "Optional Form Fields". You can also enter company specific information such as.
a. Web Site Address:
b. FTP Address: Enter your FTP address together with the username and password if you are using Retail Link.
c. Tax Number: Enter your ABN Number (Australia)/ VAT Number (Ireland and UK)
d. Number Journals From: If you wish to use sequential journal numbers then select the check box and enter the starting number here.
e. Tax Reporting Interval.
f. Tax Basis: Accrual or Cash basis.
g. Wine Equalisation Tax (Australia Only). Select this option if Wine Equalisation Tax applies to your company.
-
Addresses: Customer/Supplier addresses can be stored as either a single free text block or as individual text fields.
-
Sales: You can change the next reference numbers to be used when creating quotes/orders/delivery and invoice transactions. You can also determine how to record sales analyses.
You can select the ledger posting method for sales revenue to be either by product group, by location, by job group or by customer group.
Check the box if you wish sales orders to be tracked by delivery run number. From then on, you will be asked to type an eight-character code or less for each sale you carry out. For example, "M0120". M is for Monday, 01 is the van number, 20 is the route number. A record of the delivery run can be viewed in the Deliveries section of the customer account. If the run number in the order differs from the delivery, it can be changed at any time.
If you wish to apply a minimum margin to all sales, then select the Check Box and enter the minimum margin percentage. When a sale is being processed and the margin drops below this percentage, a warning will appear.
-
Purchasing: Change the next reference numbers to be used when creating requisitions/orders/delivery and invoice transactions.
-
Inventory/Stock: Change the way postings to the ledger will be handled on the purchase or sale of products, either by product group or by location or both. Tick the box to display stock availability for the sale location or for the total of all locations. Tick the box to show kit components on printed documents.
You can enter a sequential number for stock transfer references or select Enter as You Go.
-
Prices: You can determine the number of prices to be used from one to eight, and also determine if the prices are inclusive or exclusive of tax. You can also select the number of decimal places which are to be shown on selling prices by clicking the up-down arrows. You can also set the currency applicable to a price scale. If you set a price scale to US$, then each time you select that price scale, the price will be reflected in US$ irrespective of the currency of the customer. Therefore, if you are selling to a US customer, and you set a price scale for US customers where the currency is US$, then the price will be in US$, and will not be affected by exchange rate changes. This is beneficial where you are exporting and selling to countries at a fixed price in their currency, or alternatively, where you are selling to customers based on a fixed price in a certain currency (e.g. US$), the price will not change even if you change the exchange rate of that currency.
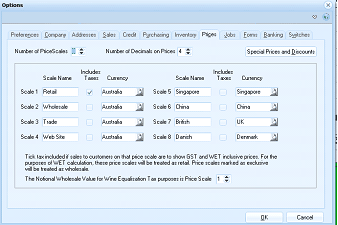 Image Description
The ABM Options dialog on the Prices tab. At the top are two fields: "Number of Price Scales" (set to 8) and "Number of Decimals on Prices" (set to 4), along with a "Special Prices and Discounts" button. Below is a table showing 8 price scales in two columns. The left column shows: Scale 1 "Retail" (Australia), Scale 2 "Wholesale" (Australia), Scale 3 (Australia), Scale 4 "Web Site" (Australia). The right column shows: Scale 5 "Singapore" (Singapore), Scale 6 "China" (China), Scale 7 "British" (UK), Scale 8 "Danish" (Denmark). Each scale has an "Includes Taxes" checkbox and a "Currency" dropdown. A note at the bottom explains that ticking "includes taxes" means sales to customers on that price scale show GST and WET inclusive prices, and for WET calculation purposes, prices marked as inclusive will be treated as retail while those not marked will be treated as wholesale. An additional field shows "The Notional Wholesale Value for Wine Equalisation Tax purposes is Price Scale" set to 1. OK and Cancel buttons are at the bottom.
-
Special Prices and Discounts: Please refer to the topic Special Prices and Discounts.
-
Jobs: There are various options available to determine how you wish to administer the job functionality.
-
Use Cost Centres: Tick this option if you wish to have cost analysed against cost centres.
-
Use Retentions: If you deduct retentions when invoicing a job, select this option.
-
Use Cost Warning: Select this option if you wish to be alerted when costs exceed the estimate.
-
Estimate Numbers: Select this option if you want estimate numbers entered sequentially. If selected you can then enter the first sequential number to use.
-
Sequential Job Codes: If you want the job codes automatically generated, then select this option. The job code will automatically increment the last job code used. Therefore, when entering job codes ensure that numeric values are entered at the end of the code (right hand part of the code).
-
Special Prices and Discounts: If you wish the special prices or discounts set up for products to be applied to jobs when these products are transferred, then select this option.
-
Use work Types: When processing transactions against jobs you can select Work Types so that the costs can be associated with different work classifications such as Variations.
-
General Ledger Postings: Postings to the general ledger can be by cost centre of by job group.
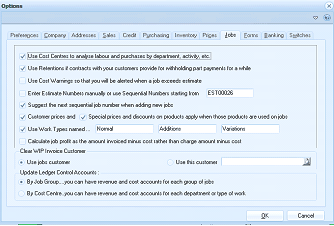 Image Description
The ABM Options dialog on the Jobs tab. Checkboxes and settings include: "Use Cost Centres to analyse labour and purchases by department, activity, etc.", "Use Retentions if contracts with your customers provide for withholding part payments for a while", "Use Cost Warning so that you will be alerted when a job costs exceeds estimate", "Enter Estimate Numbers manually or use Sequential Numbers Starting from" (with value "EST00026"), "Suggest the next sequential job number when adding new jobs", "Customer prices and Special prices and discounts on products apply when those products are used on jobs", "Use Work Types named:" (with Normal, Additions, and Variations fields), "Calculate job profit as the amount invoiced minus cost rather than charge amount minus cost", and a "Cash WIP invoices Customer" checkbox. Below are "Use Job customer" and "Use this customer" fields. An "Update Ledger Control Accounts" section offers three radio button options: "By Job Group, you can have revenue and cost accounts for each group of jobs", "By Cost Centre, you can have revenue and cost accounts for each department or type of work", with OK and Cancel buttons at the bottom.
-
Forms: Select the format to be used for all forms here. You can switch all forms to Microsoft MailMerge documents or Crystal Report files. You can also reset the location of the forms or the type of forms to be used. To select the form and printer to use for each transaction see Advanced Document Handling
 Image Description
The ABM Options dialog on the Forms tab, showing the "Required Forms Information" sub-tab. At the top are two radio button options for form type: "Use Word Mailmerge Documents" and "Use Crystal Forms (recommended)" with the Crystal Forms option selected. Below are two sub-tabs: "Required Forms Information" (active) and "Optional Forms Fields". The form shows: "Forms Folder" field (displaying "C:\ABM\Data\Forms"), a note explaining that "Forms and Printers can be selected for each type of document by selecting the File menu at the Business Today screen and selecting Printers & Forms Settings", and a "Mailing Address..." field (showing "18 Strand Street, Melbourne 3000"). OK and Cancel buttons are at the bottom.
Forms Setting Screen
Forms Setting:
a. Forms Folder: Select the default folder for your forms. Note: if a form is placed in a different folder to the default folder you will need to specify this form in Printer and Forms Settings.
b. Mailing Address: Enter the address you wish to have printed on the form.
c. Optional Form Fields: You can enter additional information which will be printed on the form. Note these fields are specific to that company, therefore, different information can be added for each company.
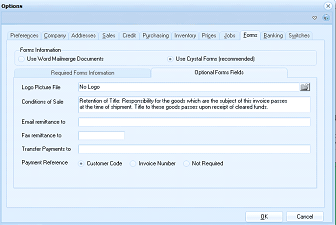 Image Description
The ABM Options dialog on the Forms tab, showing the "Optional Forms Fields" sub-tab. At the top are the same radio button options for form type: "Use Word Mailmerge Documents" and "Use Crystal Forms (recommended)". The "Optional Forms Fields" sub-tab is active, showing fields for: "Logo Picture File" (with a "No Logo" button), "Conditions of Sale" (containing sample text about retention of title and responsibility for goods), "Email remittance to" (text input), "Fax remittance to" (text input), "Transfer Payments to" (text input for bank details), and "Payment Reference" with three radio button options: "Customer Code", "Invoice Number", and "Not Required". OK and Cancel buttons are at the bottom.
-
Logo Picture File: You can place your logo on the form by selecting your logo file. The logo needs to be a BMP file. If no logo is specified then the form will not print any logo.
-
Conditions of Sale: If you wish to show conditions of sale on your forms you can enter that information here.
-
Email Remittance To: If you wish to display an email address for which remittances should be sent to you can enter that email address here. This will only appear on sales forms.
-
Fax Remittance To: If you wish to display an fax number for which remittances should be sent to you can enter that fax number here. This will only appear on sales forms.
-
Transfer Payments to: If you want your customers to transfer payments to your bank you can enter your bank information here. Example ABC Bank, Bank Code 123-456, Account Number 654321
-
Payment Reference: If you want your customers to specify a reference when sending a remittance then select either "Customer Code", "Invoice Number" or "Not Required".
-
-
Banking: Enter the posting account to be used for bank charges here. You can also set the default bank account to appear when processing receipts or payments. You can also set a sequential number for receipts and this will be incremented each time a receipt is processed.
-
Recalculate Aged Balances: When you open a customer or supplier account to view the details, the balances on each account are recalculated automatically so that the age balances reflect the up to date situation. However, on customers or suppliers with many transactions, the process of opening the account could be slow. Therefore, if you do not want the balances automatically recalculated, you can turn this option Off, by select Switches Tab, and unticking the appropriate option.
-
Financial & Tax Periods: With ABM, transactions are always processed in the current period, with the option of changing the processing date to an earlier period. From this screen you will have the option to close or block postings in previous periods by selecting 'Close Period'. The reporting period is different to the posting period. The reporting period determines the default period for reporting and viewing ledger balances, year to date values and graphs in various ledgers. For more details see Financial and Tax Periods.
-
Redirect E-mail Alerts: If the recipient of E-mail Alerts is temporarily unavailable to receive these alerts, or the recipient has changed, then you can redirect such E-mail alerts. Select Redirect E-mail Alerts and select the original recipient, then select the new recipient. See also Customer E-Mail Alerts , Job E-mail Alerts , Account E-Mail Alerts
-
Remove Obsolete Data
If you wish to remove old data from your database, you can select Remove Obsolete Data, and select the period for which you wish to remove the selected data. For example, you can remove sales or purchase orders that have been completed more than a year ago. A completed order means one that has been fully delivered and invoiced. Note: if you remove completed orders, then the Order Tracking will not be available on the invoices or deliveries relating to these orders. Warning: Ensure you take a back up of your data before deleting this information, as the selected data will be deleted and cannot be recreated.
-
Running a Database Maintenance Script: If you wish to update the database using an SQL Script select Database Maintenance Script and select the SQL Script file to be run.
-
Scheduled Tasks: With ABM, you can schedule various tasks such as Backup, Data Check or Schedule selected reports. The Scheduled task screen will display existing tasks that are set up, and allow you to create a new task. See Scheduled Tasks for details on creating new tasks.