Customising Your Software
Customising Your Software
ABM allows you to customise your software to suit your individual needs. To customise your software, go to Tools in the company menu bar, and Customise.
Custom Fields Select this option to customise your database fields. Note that each new field you add to the database must have a unique identifying Field Name to distinguish the field from any others you may have set up.
Up to 48 custom fields can be added to each account within each ledger to store information which is particular to your business. When generating a report for the selected ledger, i.e. Customers, you can customise the range of the report by selecting 'Change Selection' and selecting the custom field under the title 'Select By'.
To add a new custom field: Select the Database Table to which you wish to add a custom field, e.g. Customers. The following screen will appear:

The "Add new field to the CUSTOMERS table" dialog box. At the top is a note: "A maximum of 2 memo fields and 16 other fields can be grouped under each tab label." The form contains the following fields: Field Name (text input), Field Type (dropdown set to "Single Line Text"), Field Length ("10"), Description (text input), Group under the Label (dropdown showing "Special 1" with tabs for Special 1, Special 2, and Special 3 visible), Hint for Operator (text input), Enter on Sales (checkbox), and Calculation Formula (text input). OK and Cancel buttons are at the bottom right, with a help button at the bottom left.
New custom field screen
- Field Name: Enter the name of the field.
- Field Type: Click the arrow to select the type of field, e.g. Multi-Line Text.
- Field Length: Specify the total number of characters including decimals.
- Description: The description is used in forms and report design and is limited to the length of the field.
- Group under the Label: Enter the name which you wish to give the new tab.
- Hint for Operator: This hint appears when the user hovers the cursor over the custom field.
- Enter on Sales, Purchases, etc. Check the box if this custom field is to be displayed for entry or edit at the time of entering sales, purchases, etc.
- Calculation Formula. You can enter a formula which can calculate values from the master files. You will then be able to display the result in either the master file maintenance screen (such as Customer screen), or display on the business today List by selecting that formula using the column chooser.
Examples of some formulas that can be used:
Using very simple formula to calculate say the interest cost of all customer balances you would enter - TotalDue*5/100
or if you wanted to see which customers should be chased for payments based on the value overdue - Case when BalanceAge4 > 1000 then 'Chase' else 'OK' END
another example using cast - cast(Case when CustomerTitle like 'Cust%' then 1 Else 0 End AS bit)
-
Adding custom fields for transactions.
ABM allows you to add custom fields to the transaction tables. Therefore, different custom information can be stored for each transaction.
Transaction Header: To add a custom field that will appear when entering any transaction, select custom fields as above, and select the transheaders table. A check box is available to select the transaction type that you wish this custom field to appear.
Transaction Line Items. You can add custom fields that will appear for each line item on a transaction. If you select a numeric type field, a text field or date filed, ABM will then allow the entry of a formula calculation, the result of which can be added to the line value before or after tax (applicable to numeric fields only). Example: If the weight of each line item is to be calculated, then the formula would be Products.Weight * Transdetails.Quantity, which will then multiply the weight entered for that product by the quantity being delivered/invoiced. Note: fields from appropriate tables can be included in the formula by specifying the table name, and the field name, separated by a dot.
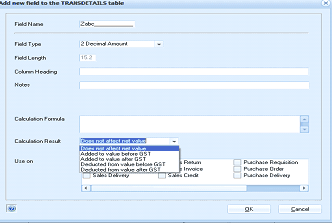 Image Description
The "Add new field to the TRANSDETAILS table" dialog box for adding custom fields to transaction line items. Fields shown include: Field Name ("Zoho_"), Field Type (dropdown set to "2 Decimal Amount"), Field Length ("15.2"), Column Heading (text input), Notes (text area), and Calculation Formula (text area). Below is a "Calculation Result" dropdown with options visible: "No calculation to be run", "Display value after calculation", "Added to value after GST", "Deducted from value before GST", "Deducted from value after GST", and "Totals Displayed". There is also a "Use on" section with checkboxes for: Return, Purchase Requisition, Invoice, Purchase Order, Sales Credit, and Purchase Delivery. OK and Cancel buttons are at the bottom.
Software Sockets ABM allows you to attach custom programs (e.g. a customer bonus point calculator program) to perform special tasks for individual users. You can attach custom programs to the Actions menu at the Business Today screen, and to socket locations throughout the other programs.
To attach a new custom program: From the Software Sockets screen, select Attach a New Custom Program.
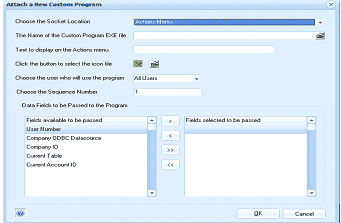 Image Description
The "Attach a New Custom Program" dialog box. The form contains the following fields: "Choose the Socket Location" (dropdown set to "Actions Menu"), "The Name of the Custom Program EXE file" (text input), "Text to display on the Actions menu" (text input), "Click the button to select the icon file" (with a browse button), "Choose the user who will use the program" (dropdown set to "All Users"), "Choose the Sequence Number" (set to "1"), and a "Data Fields to be Passed to the Program" section with two lists: "Fields available to be passed" on the left (showing User Number, Company ODBC Datasource, Company ID, Current Table, Current Account ID) and "Fields selected to be passed" on the right, with arrow buttons (">", ">>") to move fields between lists. OK and Cancel buttons are at the bottom.
Attach a New Custom Program screen
-
Choose the Socket Location: Choose a socket location from the drop-down list. Contact your ABM supplier if the socket location you require is not on the list, and they can arrange for it to be included.
-
The Name of the Custom Program EXE file: When you have created your custom program, locate it in the ABM program folder. Type the file name here.
-
Text to display on the Actions menu: Enter the text as it appears on the Actions menu. From the left on the list of the screen, select the fields to be passed by highlighting the field name, and clicking the ">" button. You can select all fields to be passed by clicking the ">>" button. When you have finished entering the appropriate data, select **OK **to add the custom program to ABM.
-
Change an Attached Program: Select this option to change the program plugged in to the highlighted socket or to alter the data to be passed to that program.
-
Remove an Attached Program: Unplugs the highlighted program from its socket.
-
Close & Update Database: Exits the database customisation program and applies all changes to the database.
-
Close: Exits the database without applying any changes at this time.
To attach a custom program to the toolbar
-
Choose the Socket Location: Choose either Customer/Supplier/Product/Job/ Ledger or Contacts toolbar socket location from the drop-down list.
-
The Name of the Custom Program EXE file: When you have created your custom program, locate it in the ABM program folder. Type the file name here.
-
Text to display on the Toolbar menu: Enter the text which will describe the custom program on the Toolbar. From the left on the list of the screen, select the fields to be passed by highlighting the field name, and clicking the ">" button. You can select all fields to be passed by clicking the ">>" button. When you have finished entering the appropriate data, select **OK **to add the custom program to ABM.
-
Select the Program Icon: You can select an program icon which will appear next to the text being displayed describing your custom program.
-
Change an Attached Program: Select this option to change the program plugged in to the highlighted socket or to alter the data to be passed to that program.
-
Remove an Attached Program: Unplugs the highlighted program from its socket.
-
Close & Update Database: Exits the database customisation program and applies all changes to the database.
-
Close: Exits the database without applying any changes at this time.
Custom Actions on Maintenance Screens
You can add a custom action to any maintenance screen such as product maintenance screen (customers,jobs suppliers or ledger) by selecting Viewer - Products Actions Menu (or whichever screen you require)
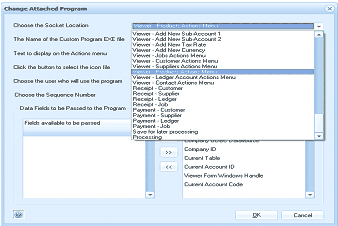 Image Description
The "Change Attached Program" dialog box showing the socket location configuration. The "Choose the Socket Location" dropdown is expanded, revealing a long list of available socket locations organized by category, including: Viewer - Add New Sub Account 1, Viewer - Add New Sub Account 2, Viewer - Add New Customer, Viewer - Add New Contact, Viewer - Customer Actions Menu, Viewer - Products Actions Menu, Viewer - Ledger Account Actions Menu, Receipt - Customer, Receipt - Supplier, Payment - Customer, Payment - Supplier, Payment - Ledger, Save for later processing, Processing, and others. The form also shows fields for custom program EXE file name, text to display on the Actions menu, icon file selection, user selection, sequence number, and data fields to be passed (showing Company ID, Current Table, Current Account ID, Viewer Form/Windows Handle, and Current Account Code).
The Action will then appear on the top of the appropriate screen.
 Image Description
The ABM Product maintenance screen showing "Open Product 2009 - Acrylic - Emerald Green 1L" with a "Custom Actions" button visible at the top left of the screen, next to the "Product Actions" menu. The screen displays the product details view with tabs for "Prices and Sales" currently visible. Fields shown include: Product Type ("Active Product"), Product Title ("Acrylic - Emerald Green 1L"), Product Code ("2001"), Barcode Number, Minimum Quantity, Maximum Quantity, and Lead Time in days. Below is a "Stock Status" section with a grid showing Location, Quantity on Hand, Last Stock Take, Order Status, and other inventory-related columns. The bottom section shows price scales (Price 1 through Price 8) with columns for Net Price, Tax %, Price inc. Tax, Margin %, and Currency. A "Switch to Alternate Product" button is visible at the bottom right. The "GST Included" checkbox is at the bottom.