Customising Data Entry Screens
Customising Data Entry Screens
You can change the appearance of the transaction processing screens by either changing the label text, hiding or disabling a data entry field (or window control), or removing the field from the tab order. **Note: **These changes can only be made by the System Administrator.
Note: There are many fields which cannot be disabled, hidden or removed from the tab order, and these options will not be available when these fields are selected. Fields such as Customer Code is a primary requirement and therefore needs to be available at all times.
To change the appearance of a transaction processing screen select the particular option E.G. Sales Invoice
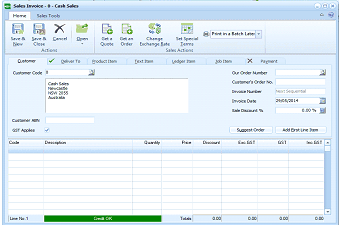
The ABM Sales Invoice data entry screen (titled "Sales Invoice - 8 - Cash Sales"). The ribbon toolbar at the top shows the Home and Sales Tools tabs, with buttons including Save & New, Save & Close, and various action buttons (Actions, Deliver Via, Product History, Ext Batch, On Quote, Set Sponsor, Exchange Rate, Print in a Batch Later). Below the ribbon are tabs: Customer, Product List, Ext Batch, Ledger Item, and Payment. The form displays fields for: Customer Code (with a dropdown showing entries like "Cash Sales", "Melbourne", "Newcastle", "Auckland"), Customer ABN, GST Applies checkbox, Our Order Number, Customer's Order No, Invoice Number, Invoice Date (26/05/2014), a "Support Order" button and "Add First Line Item" button. The main grid area shows columns: Code, Description, Quantity, Price, Discount, Exc GST, GST, and Inc GST. At the bottom left is "Line No. 1" with a credit indicator bar.
**When the screen appears **select the field you wish to change, and while holding down the CTRL key, right click the mouse. You will then be presented with a menu option of changes that can be made. Important Note: You need to select how you wish to save the changes before making the changes (see **Saving Changes **below)
- Change Text: You can change the text of the column label. E.G. If you wish to change the text of "Analysis Code", select that label and right click on the mouse while holding down the CTRL key. Select the option Change Text, this will pop up a label box so that you can enter a new description for that label.
- Remove from Tab Order: If you do not wish to change the contents of a field each time you select a transaction screen you can skip over that field by selecting Remove from Tab Order. You can still go back to that field and change its contents. However, this option could facilitate a quicker data entry sequence. Example: You could select the option to remove the tab order from the Description field when selecting products. Therefore, when you select the product code the description field is skipped when you tab through the various fields.
- Hide the Control: You can hide a field so that it is not visible when the transaction processing screen is opened. Example: If you do not wish to have Sales Discount % entered you can hide the control. Therefore, when the sales invoice screen is opened the field Sales Discount % is no longer shown.
- **Disable the Control: **You can disable fields so that the default information cannot be changed. Example: When processing a sales invoice and you enter the Quantity Invoiced the fields Quantity Delivered and Quantity Ordered will default to that quantity. Therefore, you could disable the quantity delivered and quantity ordered fields so that the default quantity cannot be changed.
Saving Changes: By selecting any field you can hold the CTRL key and right click to get the option menu. At the bottom of the menu there are three options to save the changes made.
- Changes Apply to All Users: If you want the changes to apply to all users then select this option.
- Changes Apply to a User Group: If you want the changes to apply to a particular group of users then you can select that group and the changes will only apply to users within that group.
- Changes Apply to a Selected User: If the changes are to apply to a particular user then you can select that user.
Restoring Fields: You can restore hidden or disabled fields by selecting the menu option and selecting the appropriate option. You can also restore the transaction processing screen back to its original state by selecting the option Restore Form to Standard.