Customising the ABM Interface
Customising the ABM Interface
ABM allows you to customise the appearance of your interface, for quick access to key data such as credit limits, account balance, and so on.
To customise the ABM Interface:
-
In the company menu bar, go to Tools, Options, Preferences.
-
Click the drop-down list to select the folder which you wish to customise, e.g. Customers, then click Change the columns.
-
Alternatively, place the mouse pointer onto the column headings, right click and select Column Chooser.
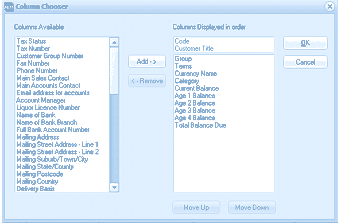 Image Description
The ABM Column Chooser dialog box for customizing customer list columns. On the left is a "Columns Available" list showing fields such as Tax Status, Tax Number, Customer Group Number, Fax Number, Phone Number, Main Sales Contact, Main Accounts Contact, Email address for accounts, Account Manager, Liquor Licence Number, Name of Bank, Name of Bank Branch, Full Bank Account Number, Mailing Address, Mailing Street Address - Line 1, Mailing Street Address - Line 2, Mailing Suburb/Town/City, Mailing State, Mailing Postcode, and Mailing Country. In the center are "Add ->" and "<- Remove" buttons. On the right is "Columns Displayed in order" showing the currently selected columns: Code, Customer Title, Group, Terms, Category, Age 1 Balance, Age 2 Balance, Age 3 Balance, Age 4 Balance, and Total Balance Due. Below the right list are "Move Up" and "Move Down" buttons. OK and Cancel buttons are at the top right.
Customer Columns Chooser
-
From the Columns Available list, select the column title you would like to display in the folder list. When the line is highlighted, click Add to add the new column the folder list. The column title is copied to the list on the right of the screen and will be displayed in the folder list.
-
To remove a column from the folder list, highlight the column on the right of the screen, and click Remove.
-
To organise your columns, select the column to the right of the screen and either Move Up or Move Down.
-
When you have selected the appropriate columns to be displayed, select OK.
Grouping, Sorting and Filter account lists:
-
Grouping
When you select the account list you can group and sub-group the list by dragging the appropriate column or columns into the box at the top of the grid
 Image Description
The ABM Customers list view with grouping enabled. The list is grouped by "Customer Group" as shown in the grouping area at the top of the grid ("Drag a column header here to group by that column" area now shows "Group" with aggregated values). The grouped rows show expandable group headers (e.g., "Group: Commercial", "Group: Retail") with subtotals for numerical columns. Each group can be expanded to show individual customer records. The columns displayed include customer code, Customer Title, Group, Terms, Category, country, and balance columns. The toolbar and navigation panel are visible as in the standard view. Customer entries like "Summerville City Council", "Freemans Rest Store", and others are visible in the grid under their respective group headings.
Customers grouped by Customer Group
When you select grouping any columns which contain values (such as Total Balance Due) will be sub-totalled for each of the grouped columns. Therefore, if you group by Customer Group the total balance due will be subtotalled for each Customer Group. You sub-group by dragging additional columns into the box at the top of the grid. **Example: **Drag the column Customer Group to the box on the top of the grid and then drag Customer Terms to the box. This will primarily group on Customer Group with sub-grouping on Terms.
-
Filtering
Filtering can be achieved by two methods within ABM.
-
Underscore ( _ ). This can be used to replace any single character in the search. Example if you wish to display all customers where the code begins with D and ends with 01 and the structure of your customer codes is that all codes are four characters in length then you could select D_01 which will return D001, D1001, D2001 etc. Therefore, the underscore is a wildcard character for the second character in this instance. **Note: **the _ is a replaceable character therefore if the customer codes are of different length this selection may not return all codes. Example D_01 will return D001, D1001 but will not return D10001.
-
Percentage (%) This can be used as a wildcard character to select all characters replaceable by the percentage sign. Therefore, If customer code are varying length then you could use D% which would return codes like D001, D1001 or D10001.** Note:** You can use a mixture of the underscore and percentage in the criteria.
**Saving Filter Details: **When you have created a filter you can select Customise on the bottom right hand screen, and select Save As, and give the filter set a file name. You can then retrieve this filter set again if required. Note: in order to open a previously saved filter set, you will need to set at least one filter item to activate the custom button.
-
Sorting
You can sort any column ascending or descending, by selecting the column heading, or by right clicking on that column, and selecting the sorting option.
Renaming Column Headings
You can change the name of the column to a name more suitable to your organisation. Example if you wish to show the heading Total Balance Due as Total Outstanding then select the column Total Balance Due and right click and select Rename Column. You can then enter whatever description suits you organisation. Note: if you rename the column headings the headings will change for all users.
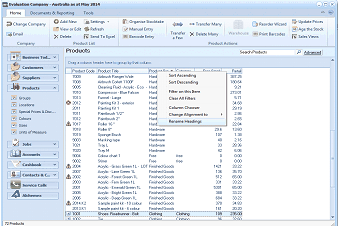 Image Description
The ABM Products list view showing the right-click context menu for column operations. The products grid displays columns including product code, description, Product Group, and other fields. A right-click context menu is visible over a column header, showing options: Sort Ascending, Sort Descending, Filter on this item, Filter (with submenu), Rename Column, Change Alignment to (with submenu), and other options. The "Rename Column" option is highlighted, demonstrating how to rename a column heading. The left navigation panel shows the Products section selected with sub-items visible.
Changing Alignment
If you wish to change the alignment of any column then right click on that column and select the option Change Alignment and select either Left Aligned, Right Aligned or Centred.
 Image Description
The ABM Products list view showing the right-click context menu with the "Change Alignment to" submenu expanded. The submenu displays three alignment options: "Left Aligned", "Right Aligned", and "Centred". This demonstrates how to change the text alignment of a column in the products grid. The main context menu also shows options for Sort Ascending, Sort Descending, Filter on this item, Filter, and Rename Column.
Customise Transaction Views
You can customise the way you view transactions details by right clicking on the transaction screen, and selecting column chooser. The available fields will appear on the left hand side, and you can then select the required columns, including custom fields. You can also decide what order these columns appear, by moving columns up or down.
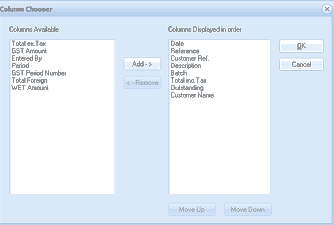 Image Description
The ABM Column Chooser dialog for customizing transaction view columns. On the left is "Columns Available" showing fields: Total inc Tax, GST Amount, Entered By, Period, GST Period Number, Total Foreign, and WET Amount. In the center are "Add ->" and "<- Remove" buttons. On the right is "Columns Displayed in order" showing: Date, Reference, Customer Ref., Description, Batch, Total inc. Tax, Outstanding, and Customer Name. Below the right list are "Move Up" and "Move Down" buttons. OK and Cancel buttons are at the top right.
Column chooser in transaction view screen.