Quick Sales
Quick Sales
To generate a Sales Invoice using Quick Sales:
The Quick Sales program will allow fast entry of sales transactions allowing you to move through the various options using the Enter Key as well as the Tab Key. Whilst its use will be primarily for Cash Sales, account sales can also be processed.
Note: The Quick Sales program will only allow for the sale of products. Sales relating to ledger lines, or job items will need to be processed through the main sales invoice program. See also restrictions to functionality below.
-
Select Customers to the left of the main screen
-
In the Sales menu bar, select Quick Sales.
When adding a new Quick sales invoice, the following screen will appear:
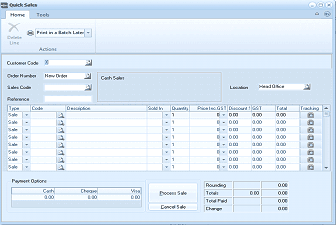 Image Description
The Quick Sales screen. The toolbar shows a Print in a Batch Later dropdown under Actions. Fields shown include Customer Code, Order Number (New Order), Sales Code (Cash Sales), Reference, Location (Head Office), and a Tracking column. The main entry area has a grid with columns for Sales code, Code, Description, Sold to, Quantity, Price Inc GS, Discount %, GST, and Other fields. Multiple empty rows are available for product entry. At the bottom, Payment Options section shows Cash, Cheques, and Visa fields (all 0.00), along with buttons for Process Sale and Cancel Sale. Running totals show Rounding, Total (0.00), Total Paid (0.00), and Change fields.
New Quick Sales Invoice
The Invoice Menu contains the following options:
-
Customer Code
-
Order Number
-
Sales Code
-
Run Number (if selected in options)
-
Location
-
Job Item
-
Customer Code The quick sales program will default to a customer with the word "Cash" in the title. If you wish to process a sale to another customer either cash or account customer, then enter the unique identifying code for the customer here. Alternatively, press F3 or click the button to the right of the field to select from the customer list. To create a new customer account, see Setting up Customer Accounts.
-
Order Number: If processing the sale from an existing order press F3 or click the button to the right of the field to select from the outstanding order list.
-
Analysis Code: The name of the appropriate contact for this item appears here. It can be changed by entering a new one or by pressing F3 or by clicking the button to select from the list.
-
Run No: Enter the delivery run number for this customer, which can be changed again at the time of each sale.
-
Location: Select the location from which the sale will be made by pressing F3 or click the button to the right of the field to select from location list.
-
Invoice Date: The invoice date is processed as today's date by default.
-
**Product Item **
-
Product Code: Enter the code of this product for this sale. Press F3 or click the button to the right of the field to select from the list. If you know the barcode, enter the barcode and it will automatically be recognised. By default the quantity is set to first unit of measure in the field to the right. You can select a different unit of measure if more than one unit of measure has been set up for that product. See Setting up Product Accounts to set up a new unit of measure for the product.
-
Description: Once the product code or barcode is entered, the description of the product, as entered in the set up phase appears.
-
Qty. Invoiced: By default the quantity to be invoiced will be 1 if sufficient stock is on hand for that location. To change the quantity, use the Tab key, or the directional arrow keys to move to the quantity field, or press the Enter Key to select the next product.
-
Price incl/ex. GST/VAT %: The price will default to the appropriate price scale for this customer. To change the price, use the Tab key, or the directional arrow keys to move to the price field, and enter the price of the product including or excluding Tax depending on the settings for the customer.
-
Discount %: To enter the discount rate that applies to this line item, if any, use the Tab Key, or the directional arrow keys to move to the discount field.
-
Payment At the bottom of the screen the cash payment methods appear. Cash and Cheque will appear together with any Credit or Debit cards that have been set up in the General Ledger. To move from one option to the other use the directional arrow keys.
-
Cash: Enter the amount of cash received.
-
Cheque: Enter any amount paid by cheque. When you process the sale a screen will appear so that you can enter the relevant information for the deposit slip.
-
Debit/Credit Cards: Enter the amount paid debit or credit card if any.
Save Settings When you have entered the relevant sales invoice details, select either: Process Sale: This will save the sales invoice information and bring you back to the main menu. or: Cancel Sale: This will cancel the sales information entered.
Restriction in Functionality
QuickSale does not provide for the following functionality which is included in normal sales.