Sales Order Automation
Sales Order Automation
**Sales Order Automation (Fulfillment Wizard) **
The sales order automation allows you to select orders for delivery/invoicing in accordance with the rules set for each customer (see Customer Delivery Rules).
-
Step 1
Select the criteria for selecting orders by selecting the options from the drop down list. You can select All Customers, a range of customers, a range of customer groups, a range of customer categories or by Delivery Run Number.
When the criteria has been selected you can then select the location delivering the products.
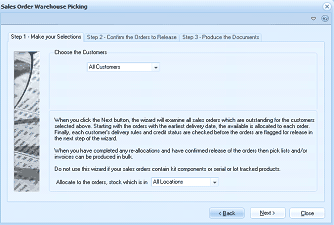 Image Description
The Sales Order Warehouse Picking wizard - Step 1 "Make your Selections". The wizard has three steps shown at top: Step 1 - Make your Selections, Step 2 - Confirm the Orders to Release, Step 3 - Produce the Documents. The "Choose the Customers" dropdown is set to "All Customers". Explanatory text describes that clicking Next will examine all outstanding sales orders, starting with the earliest delivery date, allocating available stock, checking delivery rules and credit status. A note advises not to use this wizard for sales orders containing kit components, serial or lot tracked products. An "Allocate to the orders, stock which is in: All Locations" dropdown is shown. Back, Next, and Close buttons are at the bottom.
-
Step 2
The wizard will display a list or orders for delivery. The orders will be flagged in accordance with the status of the order.
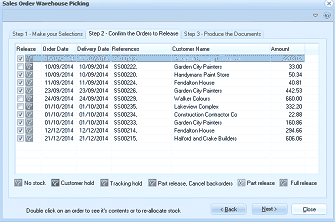 Image Description
The Sales Order Warehouse Picking wizard - Step 2 "Confirm the Orders to Release". A grid lists sales orders with columns for Release (checkbox), Order Date, Delivery Date, References, Customer Name, and Amount. Orders are shown for various customers including Garden City Planters, Hardwares Paint Store, Island Colours, Construction Contractor Co, Fendalton House, and others. Some orders have checkmarks indicating they are ready for release. Status indicators at the bottom include: No stock (square), Customer hold (square), Tracking hold, Part release Cancel backorders, Part release, and Full release checkboxes. "Double click on an order to see its contents or to re-allocate stock" instruction is shown. Back, Next, and Close buttons are at the bottom.
Order Status
Orders that are ready for release will have a tick in the box to the left of the order.
-
No Stock:
There is insufficient stock to fulfill any part of this order.
-
Customer Hold:
While there maybe sufficient stock to fulfill part of this order the customer delivery rules dictate that no partial delivery can be made. Therefore, the order can only be shipped when there is sufficient stock to complete the full order.
-
Partial Release, Cancel Back Orders:
There is sufficient stock to part fulfill this order and the customer delivery rules dictate that no back orders are allowed. Therefore, the order can be shipped with only the quantity in stock and any remaining quantity due but not shipped will be cancelled.
-
Part Release:
There is sufficient stock to part fulfill this order. The order can be shipped with the quantity in stock and any remaining quantity due will be placed on back order for shipment later.
-
Full Release:
There is sufficient stock to fulfill this order.
Changing the Allocation on Order
If you wish to change the allocation of stock on orders in order to fulfill other orders, you can double click on an order to view the details, and then select the product line. This will show the the quantity in stock, and the quantity unallocated. You can change, or reduce the quantity allocated on a particular order, and increase the quantity on an order that has insufficient product allocated.
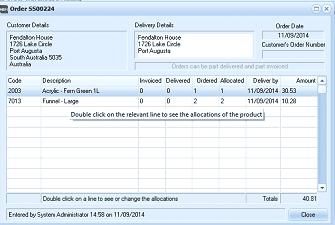 Image Description
The Order S500224 details dialog. The header shows Customer Details and Delivery Details sections with the customer name (Fendalton House, 1726 Lake Circle, Port Augusta, South Australia 5035) and delivery address. The Order Date (11/09/2014) and Customer's Order Number are shown. A note states "Orders can be part delivered and part invoiced." The product grid shows columns for Code, Description, Invoiced, Delivered, Ordered, Allocated, Deliver by date, and Amount. Two products are listed: "2003 Acrylic - Fern Green 1L" and "7013 Funnel - Large" with their respective quantities and amounts. An instruction reads "Double click on the relevant line to see the allocations of the product." Totals of 40.81 are shown. Entry information shows "Entered by System Administrator 14:58 on 11/09/2014". A Close button is at the bottom right.
Order Details
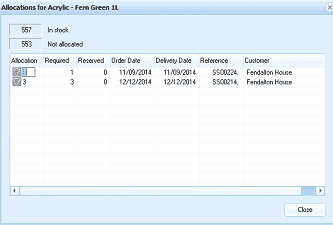 Image Description
The Allocations dialog for "Acrylic - Fern Green 1L" product. At the top, stock status shows "557 In stock" and "553 Not allocated". The allocation grid shows columns for Allocation number, Required, Reserved, Order Date, Delivery Date, Reference, and Customer. Two allocation entries are shown for Fendalton House with reference numbers S500224 and S500014, with different order and delivery dates. A Close button is at the bottom.
Allocation Details
**Step 3 - Processing the Orders **
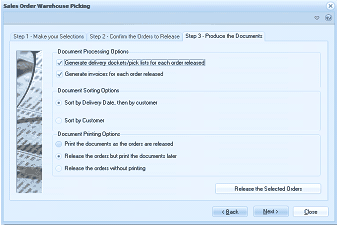 Image Description
The Sales Order Warehouse Picking wizard - Step 3 "Produce the Documents". The screen shows three sections: Document Processing Options with checkboxes for "Generate delivery dockets/pick lists for each order released" and "Generate invoices for each order released". Document Sorting Options with radio buttons for "Sort by Delivery Date, then by customer" and "Sort by Customer". Document Printing Options with radio buttons for "Print the documents as the orders are released", "Release the orders but print the documents later", and "Release the orders without printing". A "Release the Selected Orders" button is at the bottom right. Back, Next, and Close navigation buttons are also shown.
When you have completed the selection criteria select Next which will bring you to step 3 and enable you to produce the documents. When the printing options have been selected select Release the Selected Orders and this will process and print the required documents in accordance with the selections made.