Quick Sale POS
Quick Sale POS
To generate transactions using Quick Sales POS:
The Quick Sales program will allow fast entry of sales transactions allowing you to move through the various options using the Enter Key as well as the Tab Key. The Quick Sale POS will allow you to connect to a strip printer and a cash drawer.
Note: The Quick Sales program will only allow for the sale of products. Sales relating to ledger lines, or job items will need to be processed through the main sales invoice program. See also restrictions to functionality below.
Getting Started
Select the Quick Sale POS shortcut from the desktop. This will bring up a login screen as follows
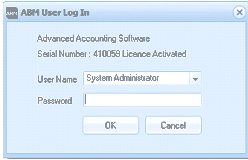
The ABM User Log In dialog box for the Advanced Accounting Software. The dialog shows "Serial Number: 410058 Licence Activated" at the top. Below are fields for User Name (dropdown set to "System Administrator") and Password (obscured field). OK and Cancel buttons are at the bottom.
When you have entered your password and select OK. This will open the POS screen.
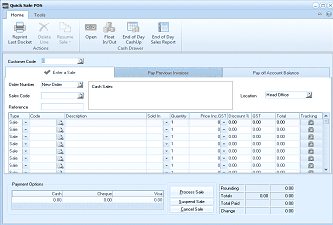
The Quick Sale POS screen. The toolbar shows buttons for Reprint Last Docket, Delete, Resume, Open, Float In/Out, End of Day Cash Up, End of Day Sales Report, and Tools. Tabs include "Enter a Sale" and "Pay Previous Invoices". Fields shown include Customer Code, Order Number (New Order), Sales Code (Cash Sales), Reference, Location (Head Office), and a Tracking checkbox. The main entry area has a grid with columns for Sales code, Code, Description, Sold to, Quantity, Price Inc GS, Discount %, GST, Total, and Tracking. Multiple empty rows are shown for product entry. At the bottom, Payment Options section shows Cash and Cheque fields (both 0.00), along with buttons for Process Sale, Suspend Sale, and Cancel Sale. Running totals show Rounding (0.00), Total (0.00), Total Paid (0.00), and Change (0.00).
POS Menu Bar
This menu bar has the following options, which can be accessed at any time:
-
Settings: The settings menu will allow you to change the Printer, Cash Drawer, Warranty Settings, Barcode Reader Settings and Pole display Settings
-
Printer Settings: There are three options available under printer settings
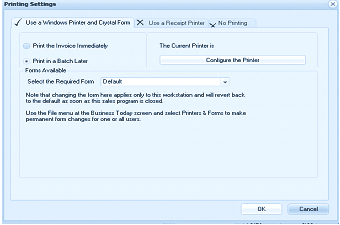
The Printing Settings dialog box with three radio button options at the top: "Use a Windows Printer and Crystal Form" (selected with checkmark), "Use a Receipt Printer" (selected with X), and "No Printing". Below are printing options including: "Print the Invoice Immediately" checkbox, "The Current Printer is" field with a "Configure the Printer" button, "Print in a Batch Later" checkbox. A "Forms Available" section shows "Select the Required Form" with a "Default" dropdown. A note explains that changing the form here applies only to this workstation and will revert to default when the sales program is closed. Another note directs users to use the File menu to make permanent form changes. OK and Cancel buttons are at the bottom.
-
Use Windows Printer and Crystal Forms
-
Use a Receipt Printer
-
No Printing
Use Windows Printer and Crystal Forms
If you wish to use the standard windows printer and Crystal forms then select this option. This will allow you to set the form you wish to use together with the method of printing (print immediately or later in a batch).
Use Receipt Printer
-
If you wish to use a receipt printer then select this option. You can select the type of printer in use and also the port the printer is connected to. Note: If using a USB printer post you should check the printer drivers at the end of the list which begin with the word Windows-.
-
Having selected the printer you can select the number of lines to feed before cutting the paper the printer cutting code (please refer to your printer manual for this information).
-
You can set the text you wish to put on your dockets for both the header and footer. You can also set the justification.
-
Show outstanding account balances on sales dockets: If you wish to show the customers account balance (account customers only) on the sales docket then select this option.
-
Show customer name on account sale dockets: If you wish to display the customer's name on the sales docket when selling to an account customer then select this option.
-
Show the product codes on sales dockets. Normally the product code would not be printed on a cash sale docket, however, if you wish to print the product code as well as the product description then select this option.
No Printing
If you do not intend to print dockets then select this option.
-
Cash Drawer Settings: You can select the port that the cash drawer is connected to. You can also enter the code will which open the cash drawer (refer to the cash drawer manual for these details)
-
Warranty Settings
-
Barcode Settings: You can select which type of barcode you wish to read if scanning products. The options available are.
-
Generic Barcode: This just reads the product code only.
-
UPC-A Barcode or EAN-13 : You will need to select either of these codes if the barcode which has been printed by a weighting scale and contains the weight and price of the product.
-
Pole Display: If you are using a pole display you can set the port the display is connected to. you can also set the number of lines to display and the length of the display.
-
Reprint Last Docket:
If the printer is jammed or you wish to print a further copy of the document just printed then select this option.
-
Cash Drawer
From the dropdown list there are four options available.
-
Open Cash Drawer: This will open the cash drawer without making a sale. Note: for security purposes you will need to enter your password in order to open the drawer.
-
Float in/out: You can enter the amount of the float placed in the drawer or removed from the drawer.
-
End of Day CashUp: At the end of the day you should enter the amount that is being withdrawn from the cash drawer. This will then compare the amounts entered to the amount taken in during the day and reconcile both amounts.
-
End of Day Cash Report: In order to assist in the reconciliation of your daily sales a report is product in Excel showing the summary of sales for the day. A second page shows the sales transactions in detail. Note: this cash report is printed for the user logged in only on that particular workstation and shows all sales made by that user during that day. Sales made through the normal sales program in ABM by that user will be included.
-
**Sales Discount: **If you wish to apply a discount to a sale then you can select the discount to be either a percentage or an amount.
-
**Delete Line: **If you have entered an item in error or wish to remove an item then select that line and select delete line.
-
Resume Sale: If you have suspended a sale(s) transaction then you can select the resume sale option and select the appropriate sale. Each sale suspended will be shown with the time the sale was suspended.
**Processing a POS Sales Invoice **
The Invoice Menu contains the following options:
-
Customer Code
-
Order Number
-
Sales Code
-
Reference
-
Run Number (if selected in options)
-
Location
-
Customer Code The quick sales program will default to a customer with the word "Cash" in the title. If you wish to process a sale to another customer either cash or account customer, then enter the unique identifying code for the customer here. Alternatively, press F3 or click the button to the right of the field to select from the customer list. To create a new customer account, see Setting up Customer Accounts.
-
Order Number: If processing the sale from an existing order press F3 or click the button to the right of the field to select from the outstanding order list.
-
Analysis Code: The name of the appropriate contact for this item appears here. It can be changed by entering a new one or by pressing F3 or by clicking the button to select from the list.
-
Reference: You can enter a reference number of name of customer (if this is a cash sale) so that you can identify this transaction later.
-
Run No: Enter the delivery run number for this customer, which can be changed again at the time of each sale.
-
Location: Select the location from which the sale will be made by pressing F3 or click the button to the right of the field to select from location list.
-
Invoice Date: The invoice date is processed as today's date by default.
-
**Product Item **
-
Product Code: Enter the code of this product for this sale. Press F3 or click the button to the right of the field to select from the list. If you know the barcode, enter the barcode and it will automatically be recognised. By default the quantity is set to first unit of measure in the field to the right. You can select a different unit of measure if more than one unit of measure has been set up for that product. See Setting up Product Accounts to set up a new unit of measure for the product.
-
Description: Once the product code or barcode is entered, the description of the product, as entered in the set up phase appears.
-
Qty. Invoiced: By default the quantity to be invoiced will be 1 if sufficient stock is on hand for that location. To change the quantity, use the Tab key, or the directional arrow keys to move to the quantity field, or press the Enter Key to select the next product.
-
Price incl/ex. GST/VAT %: The price will default to the appropriate price scale for this customer. To change the price, use the Tab key, or the directional arrow keys to move to the price field, and enter the price of the product including or excluding Tax depending on the settings for the customer.
-
Discount %: To enter the discount rate that applies to this line item, if any, use the Tab Key, or the directional arrow keys to move to the discount field.
-
Payment At the bottom of the screen the cash payment methods appear. Cash and Cheque will appear together with any Credit or Debit cards that have been set up in the General Ledger. To move from one option to the other use the directional arrow keys.
-
Cash: Enter the amount of cash received.
-
Cheque: Enter any amount paid by cheque. When you process the sale a screen will appear so that you can enter the relevant information for the deposit slip.
-
Debit/Credit Cards: Enter the amount paid debit or credit card if any.
Save Settings When you have entered the relevant sales invoice details, select either: Process Sale: This will save the sales invoice information and bring you back to the main menu.
Suspend Sale: If the processing of a particular sale needs to be delayed you can suspend that sale and process another sale in the meantime. You can suspend as many sales as you wish. (See resuming sale above) or: Cancel Sale: This will cancel the sales information entered.
Pay Previous Invoices
If a customer wishes make a payment against an invoice or invoices then enter the customers code and select the tab "Pay previous invoice" and select the appropriate invoice/s by selecting the check box. When you have finished selecting the invoices select the enter key to bring you to the payment options.
Pay off Account Balance:
If a customer wishes to pay an amount off his account (as opposed to paying specific invoices) then select the customer code and select the tab "Pay off Customer Balance". Enter the amount to be paid under the payment options.
Restriction in Functionality
QuickSalePos does not provide for the following functionality which is included in normal sales.
-
It will not allow the entry of cost on non-diminishing items at the time of sale.
-
Analysis is per invoice only.
-
You cannot enter job or ledger lines
-
No manually entered invoice numbers
-
There is no support for custom fields
-
You cannot change the terms at the time of sale
-
It does not support warehouse bin numbers