Product Transfers to Multiple Locations
Product Transfers to Multiple Locations
Transfer Multiple Products from one Location to Another:
If you are transferring just a few products from one location to another, or making adjustments to some products, then you should select Transfer or Write Off a Few. Otherwise, if you are transferring a large number of products from one location to another, then select Transfer Many Between Locations.
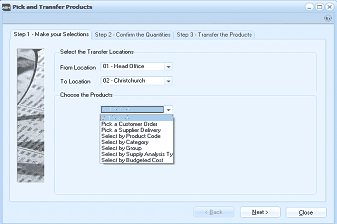
The "Pick and Transfer Products" wizard at Step 1 - Make your Selections. The dialog has three step tabs: "Step 1 - Make your Selections," "Step 2 - Confirm the Quantities," and "Step 3 - Transfer the Products." The "Select the Transfer Locations" section shows "From Location" set to "01 - Head Office" and "To Location" set to "02 - Christchurch" via dropdown lists. The "Choose the Products" section displays a dropdown list with selection options including: Pick a Customer Order, Pick a Supplier Delivery, Select by Product Code, Select by Category, Select by Group, Select by Supply Analysis Ty(pe), and Select by Budgeted Cost. Back, Next, and Close buttons are at the bottom.
Step 1 - Make Selections
First of all you will need to select the location dispatching the products, and then the location receipting the products.
Once you have chosen the locations you need to determine the method of selection for the transfer of the products.
-
All Products
This will select all products that are in the transferring location and make available for inclusion in the transfer.
-
Customer Order
The transfer can be based on a customer's order which may need to be supplied from the receipting location. Select the appropriate customer, and then select the relevant order.
-
Supplier Order
The transfers can be based on the delivery of a suppliers order. Select the supplier and select the order upon which the transfer is to be based,
-
Product Code
You can select the transfer based on a range of product codes.
-
Product Category
You can select the transfer based on a particular product category or a range of product categories. The available categories will be available on a drop down list.
-
Product Group
You can select the transfer based on a particular product group or a range of product groups.
Step 2 - Confirm the Quantities
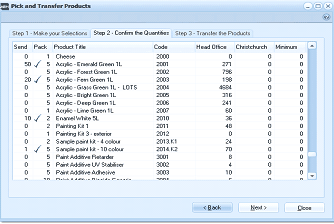
The "Pick and Transfer Products" wizard at Step 2 - Confirm the Quantities. A grid displays the products available for transfer with columns for Send (quantity to transfer), Pack (unit of measure), Product Title, Code (product code), Head Office (quantity on hand at source), Christchurch (quantity on hand at destination), and Minimum (minimum stock level). Products listed include items like "Acrylic - Emerald Green 1L" (code 2001), "Acrylic - Forest Green 1L" (code 2002), and "Paint Additive Biocide" (code 3004) among others. Some rows have checkmarks in the Send column indicating selected quantities, while others show quantities like "50" or "10." Sample paint kit items are also listed with tick marks. Back, Next, and Close buttons appear at the bottom.
Columns Available
-
Send
If you have selected a customer or supplier order, then the quantity to send will be automatically populated with the quantity on the order. Otherwise, you need to enter the quantity to send in the left hand column.
-
Pack
The unit of measure of the product.
-
Product Title
The description or title of the product.
-
Code
The Product Code
-
Transferring Location
The quantity on hand at that location.
-
Receipting Location
The quantity on hand at the receipting location.
-
Minimum Quantity
The minimum quantity that should be held at the receipting location.
When you enter a quantity to be transferred, a (positive tick) will be placed beside the product if there is sufficient stock to transfer, otherwise, an will be placed beside the product to signify that there is insufficient stock available to transfer.
Step 3 - Transfer the Products
Having made your selections, select step 3, enter a transfer reference and select Transfer the Listed Products to the Destination