Entering Stock Take
Entering Stock Take
To enter Stock Take results: When the assigned user enters the stock take results, the product parameters selected appear automatically. If more than one batch has been assigned to that user, you can select a different batch from the drop-down list.
-
Select **Products **in the main screen.
-
In the Stock Transactions menu bar, select** Enter** Stock Take, and a screen appears as below:
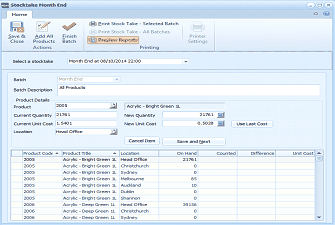
The Stocktake Month End screen in ABM for entering stock take results. The toolbar includes buttons for Save & Close, Add All Products, Finish Batch, and a Printing section with options for Print Stock Take (Selected Batch), Print Stock Take (All Batches), Progress Reports, and Printer Settings. A dropdown at the top shows "Month End at 06/10/2014 22:00." Below are fields for Batch, Batch Description (All Products), Product Details (2005 - Acrylic - Bright Green 1L), Current Quantity (21761), New Quantity (21761), Current Unit Cost (1.963), New Unit Cost, a "Use Last Cost" checkbox, and Location (Head Office). Cancel Item and Save and Next buttons are visible. The lower grid shows columns for Product Code, Product Title, Location, On Hand, Counted, Difference, and Unit Cost, listing products like "Acrylic - Bright Green" across various locations including Head Office, Melbourne, Auckland, and Christchurch.
Stock Take screen for entering results
- Printing: Select this option to print the stock take or set the printer properties.
- Add All Products: Allows you to add records for all products to the current location.
- Finish Batch: Marks the batch as complete.
- Save and Close: Saves the stock take and close the screen.
Importing a PDE File:
If you have selected the option "Imported Stocktake" at the set-up stage then when you select enter "Manually enter Stocktake Data" an extra button will appear allowing you to import the PDE file.
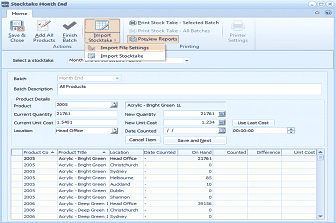
The Stocktake Month End screen with the Import Stocktake dropdown menu visible. The toolbar shows the same buttons as the standard stocktake screen, plus an additional dropdown showing "Import File Settings" and "Import Stocktake" options. The stocktake data is displayed for "Month End" with batch description "All Products." Product details show item 2005 - Acrylic - Bright Green 1L with quantity and cost fields. The grid below lists multiple products with columns for Product Code, Product Title, Location, Date Counted, On Hand, Counted, Difference, and Unit Cost. An additional "Date Counted" and time column are visible compared to the standard entry screen.
Import File Settings
Before importing the PDE file you need to set the format of the file. this can be done by selecting the Import File Settings from the drop-down list.
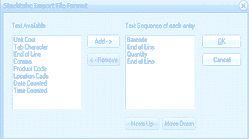
The Stocktake Import File Format dialog box. The left side shows "Text Available" with a list of available field types: Unit Cost, Tab Character, End of Line, Comma, Product Code, and Date Counted. In the center are "Add ->" and "<- Remove" buttons for moving fields between lists. The right side shows "Text Sequence of each entry" listing the current import format: Barcode, End of Line, Quantity, End of Line. OK and Cancel buttons are at the right side of the dialog.
You can select the fields to include from the left hand side of the screen and Add them to the right hand side. You should also add the separator that is used to separate each field such as Tab Character.
Importing the File
Once you have set the format of the file then select Import Stocktake from the drop-down list. This will then allow you to browse for the appropriate file. Once the file is selected it will automatically read in the data contained in the file and update the quantity counted for each product.
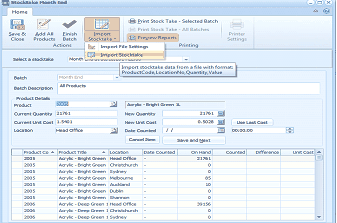
The Stocktake Month End screen showing imported stocktake data. The toolbar includes the standard stocktake buttons plus the Import dropdown with a tooltip showing "Import stocktake data from a file with format: ProductCode,LocationNo,Quantity,Value." The grid displays imported product data including Product Code, Product Title, Location, Date Counted, On Hand, Counted, Difference, and Unit Cost columns. Products such as "Acrylic - Bright Green" across multiple locations (Head Office, Melbourne, Auckland, Christchurch) are listed with their quantities and costs. The product details section shows the currently selected item (2005 - Acrylic - Bright Green 1L) with fields for current and new quantities, unit costs, and location.
You can amend the quantity and or cost if required, and enter the date and time the product was counted. If the date and time the stocktake was counted is contained in the PDE file then these fields will be populated automatically. Once you are satisfied that all changes have been made you can select Finish Batch from the menu bar.