Adding New Outlook Contacts
Adding New Outlook Contacts
The contacts screen allows you to select contacts or add new contacts. you can also set your email and documents folder for this supplier.
Set up any number of contacts for any customer or supplier. To add a contact, click Add a New Outlook Contact, at the bottom of the screen.
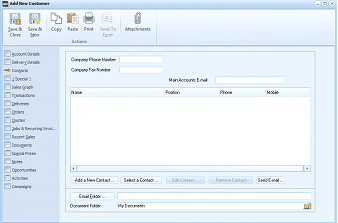
The "Add New Customer" window showing the Contacts tab. The left sidebar shows navigation tabs including Account Details, Delivery Details, Contacts (currently selected), Sales Graph, Transactions, Deliveries, Orders, Jobs & Recurring Invoices, Recent Sales, Documents, Special Prices, Notes, Opportunities, and Campaigns. The main area displays contact fields including Company Phone Number, Company Fax Number, and Main Account E-mail at the top. Below is a contacts grid with columns for Name, Position, Phone, and Mobile. At the bottom are buttons: "Add a New Contact", "Select a Contact", "Edit Contact", "Finance Contact", and "Send Email". Below that are Email Folder and Document Folder fields (showing "My Documents").
Contacts

The "Add New Contact" dialog window. The toolbar includes Save & Close and Update Outlook buttons under "Actions". The "Details" section contains fields for: Person's Name (with title dropdown), File as, Type of Contact (with radio buttons for Customer, Supplier, and Other), Company Name, Business Email Address, Home Email, Business Phone, Home Phone, Business Fax Number, Mobile Phone, Position, Street Line 1, Street Line 2, City, State, Country, and Post Code. The form is blank and ready for new contact entry.
Untitled - Contact
Adding Contacts
-
Full Name: Type the full name of the contact. Ensure that you type the full name, as this can be useful later for mail merge purposes. Alternatively, select Full Name to see how the full name is composed. Again this is useful for mail merge.
-
Job Title: Type the contact's job title, e.g. Financial Controller. This can be both useful and time saving when querying invoices from suppliers.
-
Company: Type the name of the company that the contact represents.
-
File As: Using the drop-down menu, select a format for displaying contacts. For example, you may want to have the company name appearing first with the contact name second, for example, ABC Ltd., Joe Smith.
-
Address: Type the full postal address of this contact. Alternatively you can select Address to see how the address is composed. Use the drop-down list to the left of the field to state whether the address is Business, Home, or Other.
-
Phone: The telephone symbol to the right of the Contact screen indicates that phone numbers are to be entered here. Click the down arrow to the left of the field to select a description for the number you want, such as Business, Home, Business Fax or Mobile. When you are entering a phone number, a pencil symbol appears to the right of the field. Click the symbol to see how the phone number is composed. This phone number appears beside the customer name in the title bar of each customer account.
-
Email: Use the drop-down list to specify which e-mail address applies to the address. You can assign up to three addresses to the contact by labelling each e-mail address. You can either type the full e-mail address in the field provided, or click the book symbol to the right to select an e-mail address from Outlook.
-
Display as: The default name in the "To" tab of your e-mail is the Full Name information, followed by the e-mail address. You can change this for the current contact by simply typing over the default text.
-
Web page Address: Type the full web address here, for example, www.abc.net.
-
IM Address: Type the Internet Mail address.
-
Notes: A Notes area is provided for any notes or observations you want to record.
-
Contacts: This displays a list of contacts that you can link with this primary contact, allowing you to group related contacts.
-
Categories: This field is used for reporting purposes. By typing a category name, this contact will be added to this category. Alternatively an existing category can be selected by clicking Categories to the left of the field.
-
Private: Choose if this contact is a personal contact. Again this can be useful for reporting purposes.
Email Folder: Type the Outlook folder to which all e-mails from the supplier will be saved, or select a folder by clicking E-mail Folder.
Document Folder: All Word and Excel files relating to this supplier can be stored in a folder specified here. Alternatively, you can select from an existing folder by clicking Document Folder.