Modifying Report Groups
Modifying Report Groups
To modify report groups:
-
From the main Reports screen, select the report you want to copy or edit and select **Tools **from the Menu bar The following drop-down menu appears:
 Image Description
The Reports toolbar ribbon showing the Tools tab selected. The Report Actions section displays buttons for: Add a New Report, Edit the Report Details, Edit the Crystal Report, Remove a Report, Copy a Report, Set selections for a report, Synchronize System Reports, Create a New Report Schedule, and Modify Report Groups.
-
Select Modify Report Groups from the list and the Report Groups screen appears:
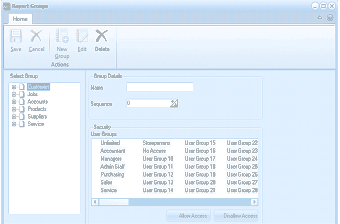 Image Description
The Report Groups dialog window. The toolbar ribbon shows the Home tab with buttons for Save, Cancel, New Group, Edit, List, and Delete under the Actions group. The left side shows a Select Group tree with expandable groups including: All, Accounts, Assets, Contacts, Customers, Jobs, Products, Suppliers, and Totals. The right side shows Group Details with fields for Name, Sequence (set to 0), and a Security section listing User Groups (Unlinked, Accountant, Managers, Admin Staff, Purchasing, Sales, Service, Storekeepers, and additional numbered User Groups 15-25) with checkboxes. Allow Access and Disallow Access buttons appear at the bottom right.
-
Expand the report group list by clicking the "+" buttons and select the relevant report, e.g. Debtor Reports.
-
The user group security features of the selected report are displayed. Green ticks beside the user group indicate the group has access to the report. Red exes indicate the report group does not have access to the report.
-
If you want to modify features of the report, select Edit from the menu bar. You can change the name and sequence of the report at this stage. If you want to change the security features of the user group, select the relevant group, and select either Allow Access or Disallow Access.
-
When you have finished making the appropriate changes to the report group, select Save to record changes.