Project Invoicing
Project Invoicing
Project Invoicing
The project invoice module allows you to invoice charges to a job according to variable criteria.
Select Jobs in the Folders list (left of screen).
Select the required Job and select "Project Invoicing".
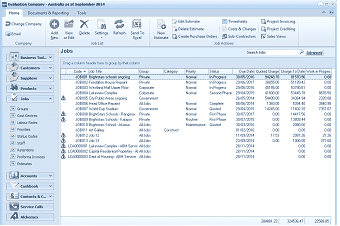
The ABM main application window is shown displaying the "Jobs" list view. The title bar shows "Evaluation Company - Australia as at September 2014". The left side shows a folder navigation tree. The main viewing area on the right displays a "Jobs" list with a search bar and "Advanced" link. The list shows multiple job records in a data grid with columns for Code, Job Title, Group, Category, Status, Quoted, Charges, and other financial columns. Visible job entries include various jobs with their groups, statuses (like In Progress), and financial values. A toolbar at the top includes buttons for Edit Estimate, Timesheets, Costs & Charges, Create Purchase Orders, Sub-Contractors, and Project Invoicing. The bottom shows totals.
List of Jobs.
Step 1 - Selection
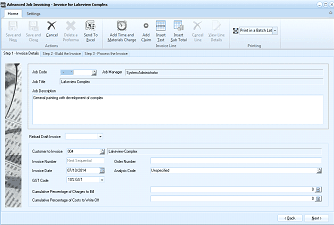
The "Advanced Job Invoicing" dialog window is displayed showing Step 1 "Invoice Details" for invoicing the "Lakeview Complex" job. The window has Home and Settings tabs in the toolbar with buttons for Save and Close, Save as Proforma, Cancel, Delete, Send To Excel, and printing options. Below the toolbar are step indicators: "Step 1 - Invoice Details", "Step 2 - Build the Invoice", and "Step 3 - Process the Invoice". The form shows fields for Job Code (with a finder), Job Title, Job Manager ("System Administrator"), Customer details (showing "004" and "Lakeview Complex"), "Reload Draft Invoice" checkbox, Invoice Number (showing "Next Sequential"), Order Number, Invoice Date (07/10/14), Analysis Code (showing "Unspecified"), GST/VAT Code (showing "10% GST"), "Cumulative Percentage of Charges to Bill" (empty), and "Cumulative Percentage of Costs to Write Off" (empty). A "Job Description" text area shows the job description. Navigation buttons "Back" and "Sort" appear at the bottom right.
On the first screen you can select the job and customer you wish to invoice.
The customer associated with the job will be automatically selected.
Options Available:
-
Job Code
Enter the code for the job you wish to invoice. You can select the finder or F3 to obtain a list of the jobs.
-
Job Description
If you wish to enter an additional description of the work carried out as well as the description of the line items to describe the work done.
-
Reload Draft
If you have processed a project invoice as a proforma then that proforma can be reloaded for invoicing. See saving as a proforma invoice in this section.
-
Invoice Number
If you have opted to enter invoice numbers manually you can enter the invoice number here. Otherwise the Next Sequential number will be taken.
-
Order Number
Enter the customer order number if applicable.
-
Invoice Date
Enter the invoice date.
-
Analysis Code
Select the sales person associated with this invoice. You can select the finder or F3 to obtain a list of the sales analysis codes.
-
GST/VAT Code
Select the applicable GST/VAT code for this invoice.
-
Cumulative Percentage of Charges to Bill
If you wish to issue the invoice for a percentage of the charges then enter that percentage here. Otherwise if you are invoicing the full job, leave as zero. Example: You have completed 20% of a job, and have agreed with your customer that that 20% can be invoiced now. Therefore, enter 20 as the cumulative percentage. When you issue a further invoice for another 20% then enter the cumulative as 40.
-
Cumulative Percentage of Costs to Write Off
When issuing an invoice for a job you can write off all the costs from your work in progress value (WIP) or write off a percentage. This would be applicable in the case whereby you are only invoicing a percentage of the charges. It is possible that the percentage of the WIP being written off would be different from the percentage of the work being invoiced. Such a situation would arise where you have agreed to invoice 20% of the work done so far, however 30% of the charges so far may relate to this charge. Example: You have completed 20% of a job, and have agreed with your customer that that 20% can be invoiced now and you wish to associate 20% of the costs to date to this invoice. Therefore, enter 20 as the cumulative percentage. When you issue a further invoice and wish to write off another 20%, then enter the cumulative as 40.
Step 2 - Build the Invoice:
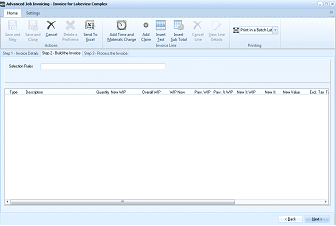
The "Advanced Job Invoicing" dialog window is displayed showing Step 2 "Build the Invoice" for the "Lakeview Complex" job. The toolbar includes Save and Close, Save as Proforma, Cancel, Delete, Send To Excel, "Add Time and Materials", "Add Claim", "Add Text" buttons, and printing options. The step indicators show Step 2 is active. The main area shows "Selection Rules" at the top and a "Description" field. Below is a data grid with columns for Type, Description, Quantity, New WIP, Overall WIP, WIP Now, Plan WIP, Plan % WIP, Plan % WIP, New S WIP, New % WIP, New Value, Ext. Tax, and other financial columns. The grid is currently empty, ready for adding invoice line items. An "Invoice Line" section is visible. Navigation buttons "Back" and "Next" appear at the bottom right.
When invoicing a job you can select to either invoice time and materials or invoice a claim. Select the appropriate option from the drop-down list "Add Line". Please note that you can add a mixture of time and materials and job claims to the invoice.
-
Time and Materials
You can select the charges based on the actual charge items applied to the job. When entering costs to the job the charge associated with each costs can be entered manually or charged on the basis of cost plus a percentage. See Adding Jobs. Therefore, if you wish to show the detailed items on the job you should select this option.
-
Job Claim
On large jobs, or jobs expanding over a period of time, it is usual to process a claim or claims for such jobs. These claims would be in accordance to the contract awarded. In this situation you would set up the claim and enter the contract value for that claim. You will then be able to invoice all, or a percentage, of the claim as required.
-
Add Text
If you wish to add text to the invoice then select this option.
-
Insert subtotal
You can insert subtotals at any point within the invoice layout. Example: If you have selected "Time and Materials" you could add a subtotal for all labour charges or for each employee or add subtotal for materials. The subtotal lines can be dragged up or down if you wish to reposition the subtotalling. Each section will have its own subtotal and the invoice will show the overall grand total at the bottom. These subtotals will be saved when you process the invoice and will be available for view when you select the "Transactions" tab and select "View Transactions". The subtotals will also be printed on the invoice.
Adding Charges to the Project Invoice
Time and Materials
To add time and materials to the job select "Add Line" and select "Time and Materials". This will bring up a further screen as follows:
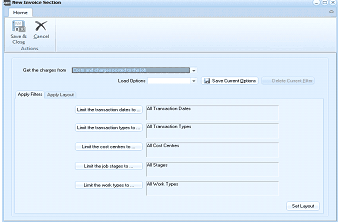
The "New Invoice Section" dialog window is displayed for configuring time and materials selection for a project invoice. The window has a Home tab with Save & Close and Cancel buttons under "Actions". The main area shows a "Get the charges from" dropdown (showing an option for charges posted to the job or from an estimate), a "Load Options" dropdown for reloading saved filter configurations, and buttons for "Save Current Options" and "Delete Current Filter". Two tabs are shown: "Apply Filters" (currently active) and "Apply Layout". The Apply Filters tab displays filter options including: "Limit the transaction dates to" (set to "All Transaction Dates"), "Limit the transaction types to" (set to "All Transaction Types"), "Limit the cost centres to" (set to "All Cost Centres"), "Limit the job stages to" (set to "All Stages"), and "Limit the work types to" (set to "All Work Types"). A "Set Filters" button appears at the bottom right.
-
Get the charges from. The charges can be obtained from the cost and charges posted to the job or from an Estimate
-
Apply Filters: Filters can be set to restrict the transaction for a date range, transaction types, cost centres, job stages or work types.
-
Apply Layout:
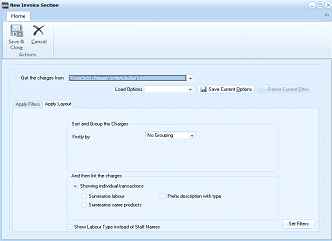
The "New Invoice Section" dialog window is displayed showing the "Apply Layout" tab for configuring how charges are grouped and displayed on the project invoice. The window has a Home tab with Save & Close and Cancel buttons. The "Get the charges from" dropdown is visible at the top along with "Load Options", "Save Current Options", and "Delete Current Filter" buttons. The Apply Layout tab shows two sections: "Sort and Group the Charges" with a "Filter by" dropdown (set to "No Grouping") and a secondary dropdown. Below that is "And then list the charges" with radio button options: "Showing individual transactions" (selected) with checkboxes for "Summarise labour" and "Prefix description with type", and "Summarise same products". Additionally there is a "Show Labour Type instead of Staff Names" checkbox. A "Set Filters" button appears at the bottom right.
You can select the layout you require for the invoice by selecting:
-
Filter By: You can select up to three filters. The filter options are Cost Centre, Transaction Type, Job Stage or Work Type. On the first filter you can select the option to automatically enter a subtotal for each change in the filter selected. Example: If you select "Cost Centre" then each time a cost centre changes a subtotal will be inserted.
-
Show Individual Transactions or Show Group Totals Only: You can select to "Show the individual transactions" or just "Show the group totals only" for the filter item selected. If you choose "show individual transactions" then you can select to summarise all labour items as Labour and summarise the same products. Example: If you have added Widgets on two occasions, firstly with a quantity of 10 and then with a quantity of 5 then select summarise, Widgets will appear as one item with a quantity of 15. Please note that if you have selected "No Grouping" in the "Filter By" section then the option "Show group totals" will not appear as an option.
-
Show Labour Type instead of Staff Names: You select this option if you wish to display the labour type (such as Engineers) as opposed to showing Labour - J Smith. Please note if you select "summarise labour" then this option will change to "show subtotals for each labour rate".
-
Prefix Description with Type: If you want to display the transaction type such as Labour, Purchase etc, then select this option, and it will place the transaction type in front of the description.
-
Save Current Options: When you have selected the filters and layout, you can save your options and "Reload" these options for further invoicing on all jobs. Example: If you set your layout to "group by cost centre" and "subtotal" you could then save your layout as CostCentreSelection. When you select project invoicing again you can "Reload" CostCentreSelection from the drop-down list and this will make your automatic selections.
-
Save and Close: When you have finished with your selection select Save and Close to return the selected items to the invoice selection screen.
Viewing and Editing the Items Selected
When you have selected the items to include in your invoice, those items will be displayed according to your selection.
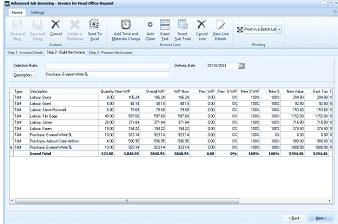
The "Advanced Job Invoicing" dialog window is displayed showing Step 2 "Build the Invoice" for the "Head Office Request" job. The toolbar shows standard buttons. The "Selection Rules" field shows "Purchases: Council Works SL" and a "Delivery Date" field showing "30/10/2014". The main data grid is populated with multiple invoice line items, each showing columns for Type, Description, Quantity, New WIP, Overall WIP, WIP Now, Plan WIP, Plan % WIP, New S WIP, New Value, Ext. Tax, and others. Line items include various types (T64, T58, Labour, etc.) with descriptions like "Labour Brass", "Labour Tony/well", "Labour Jones", "Labour - Adam", and "Purchase items" with associated costs, quantities, and WIP values. A "Grand Total" row at the bottom summarizes all values. Navigation buttons "Back" and "Next" appear at the bottom right.
- Add subtotals: You can add a subtotal at any point within the invoice screen. Select a line and select "Add Line" and select "Add subtotal" this will insert a subtotal under the highlighted line. You can add as many subtotals as is necessary.
- Description: You can change the description on each line or subtotal line by selecting that line and selecting the "Description" button. This will open up a window allowing you to change or enter a new description.
- View Line Details: You can view and edit the details of each line by selecting "View Line Details" from the menu. When the line details are displayed you can then change the amount of WIP to be written off, and the charge amount to be invoiced. The charge amount can be increased or decreased by either entering the total amount in the New Value column, or the Unit Charge column. Note changing the WIP to write off will not change the costs for this line, it will only change the amount you now wish to process at this time. Therefore, the next occasion you select to invoice this job the remainder will be invoiced.
- Cancel Line: If you wish to invoice some of the line items at this point you can remove the items from the list by selecting that line and select cancel line.
- Send To Excel: You can send the list of items selected to an Excel spreadsheet for further use or additional calculation.
- Column Chooser: You can decide which columns you wish to see on the invoice layout screen by selecting the "column chooser" and selecting, or deselecting, the appropriate columns. To select the "column chooser", right click on the column heading and select the option for "column chooser".
Add a Claim
You can add a claim based on a contract value to the invoice. To add claims select "Add Line" and select "Add Claim". If you have entered previous claims they will be listed on the Claim Screen and you can select a particular claim. Otherwise select "New Claim". When you select "New Claim" the following screen will appear.
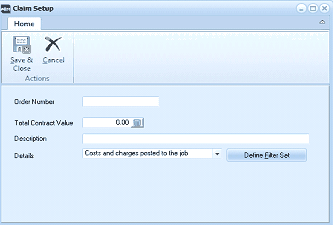
The "Claim Setup" dialog window is displayed as a compact form for setting up a job claim. The window has a Home tab with Save & Close and Cancel buttons under "Actions". The form contains fields for "Order Number" (empty text field), "Total Contract Value" (showing "0.00" with a calculator button), "Description" (empty text field), and "Details" with a dropdown (set to "Costs and charges posted to the job") and a "Define Filter Set" button. This dialog is used to create a new claim by entering the contract value and selecting how costs should be attributed to the claim.
-
Order Number: Enter an order or claim number for this claim.
-
Description: Enter an appropriate description for this claim
-
Details: You can select how the cost is to be attributed to this claim. The selection can be as follows.
- Cost and charges posted to the job. These will be the costs associated with transactions posted to the job. Filters can be set to restrict the transaction for a date range, transaction types, cost centres, job stages or work types.
- I will enter the costs to write off: This will allow you to specify manually the amount of cost to be written off WIP. If you select this option a screen will appear so that you can select the amount to be written off WIP for each cost centre and job stage.
- Estimate: You can select the costs based on the items entered on an estimate.
When you have selected the claim, the claim value and description will appear on the invoice screen. You can change the items to be written off WIP by selecting that line and select "View Line Details". The following screen will appear.
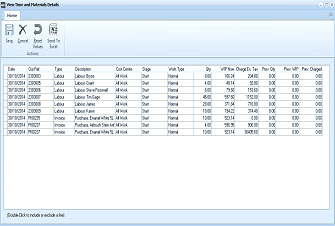
The "View Time and Materials Details" dialog window is displayed showing the detailed breakdown of time and materials for a project invoice claim. The toolbar includes Stop, Cancel, Send To Excel, and Print buttons. The main area shows a data grid with columns for Date, Out Ref, Type, Description, Cost Centre, Stage, Work Type, WIP Rate, Charges Ex Tax, Per Qty, Per WIP, and Per Charged. Multiple rows are listed showing various transaction types including Labour (Labour Brass, Labour Tony/well, Labour Jones, Labour - Adam) and Purchase items (such as Enamel White 5L, Paint, Purchase items) with their associated dates, quantities, costs, and WIP amounts. At the bottom is a note: "(Double click to include or exclude a line)". Buttons for Stop and Cancel appear in the toolbar. This view allows users to review and edit individual line items, exclude items by double-clicking, and adjust WIP amounts before processing the invoice.
In order to remove an item from the list select the item and double click. This will put a grey line through that item and remove the values from the WIP amount to be written off. You can also change the amount or percentage of WIP to be written off by selecting that line and editing the appropriate column. If you have made a mistake or wish to revert to the old values then select Reset Values. When you have finished making the changes select "Save".
Step 3 - Process the Invoice
Once you have selected the transaction to be invoiced, you can then amend the retention amount and retention date (if applicable) if required. You can select the method of printing, either immediately, print later, or no printing required by selecting "Printing" on the top left hand corner of the screen. **Note: **You can preview the invoice prior to processing and then make changes if required before processing the transaction.
There are two processing options available, either process the invoice and update the customer account, or save, and process the invoice as a proforma invoice.
If you save as a proforma invoice, it will not update the customer's account, but is merely sent to the customer for approval before finalising as a finished invoice. You can recall this proforma invoice for amendment at any stage, and then process as an invoice when it has been fully approved.
The summary of your invoice will then be displayed as per the following screen.
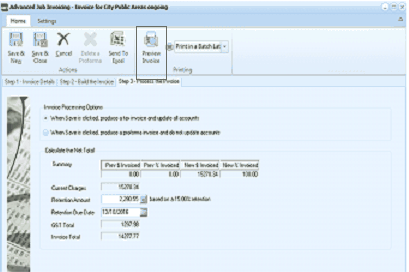
The "Advanced Job Invoicing" dialog window is displayed showing Step 3 "Process the Invoice" for the "City Public Areas ongoing" job. The toolbar includes Save & New, Save & Close, Save as Proforma, Cancel, Delete, Send To Excel, and a "Preview Invoice" button, plus "Print in a Batch Later" dropdown. The step indicators show Step 3 is active. The main area shows "Invoice Processing Options" with two options: "When Save is clicked, produce a live invoice and update accounts" and "When Save is clicked, produce a proforma invoice and do not update accounts". Below is a "Calculate the Net Total" section showing a summary table with columns for Summary, Prev % Invoiced, Prev't Invoiced, New % Invoiced, New % Invoiced, with rows for "Current Charges", "Retention Amount" (showing a value "based on a 10.00% retention"), "Retention Due Date" (with a date field), "GST Total", and "Invoice Total". The table shows the progression from previously invoiced amounts to the new amounts being invoiced. This is the final review screen before processing the project invoice.
This will show the amount to be invoiced now together with the amount invoiced previously (if any) as well as the percentage invoiced.
Preview: You can preview the Project Invoice prior to processing , and then go back and make changes if required. To preview the invoice select Preview Invoice from the menu bar.
When you are ready to process select either "Save and New" or "Save and Close".
Crediting a Project Invoice
If you wish to credit a project invoice then select "Project Credit" from the menu bar. Select the job code (if not preselected) and select the invoice number from the drop-down list.
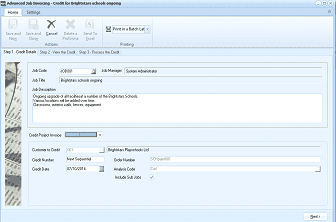
The "Advanced Job Invoicing" dialog window is displayed showing Step 1 "Credit Details" for crediting a project invoice for the "Brightstars schools ongoing" job. The title bar shows "Credit for Brightstars schools ongoing". The toolbar includes standard buttons and a "Print in a Batch Later" dropdown. The step indicators show "Step 1 - Credit Details", "Step 2 - View the Credit", and "Step 3 - Process the Credit". The form shows fields for Job Code (showing "JOB001"), Job Manager ("System Administrator"), Job Title ("Brightstars schools ongoing"), and a "Job Description" text area describing the ongoing upgrade project. Below is a "Credit Project Invoice" section showing fields for "Customer to Credit" (showing "Brightstars Playschools Ltd"), "Credit Number" ("Next Sequential"), "Sale Number" (empty), "Credit Date" (07/10/2013), and "Analysis Code" (showing "Include Sub Jobs" option). This screen is the first step in the process of crediting a previously issued project invoice.
When you select the appropriate invoice this will display the items originally invoiced on the screen when you select "Next". If wish to partially credit a project invoice then select the line items you do not wish to credit and select Cancel. This will remove the line items that will be credited and the remaining items will then be credited.
When you have selected all items select "Next" to move to the final stage (step 3) and select "Save and New" or "Save and Close" to process the credit.