Clear WIP
Clear WIP
It may be necessary from time to time to write off the value of WIP on a job. This may happen due to Job being completed and additional work was necessitated but you are not able to invoice such work.
Before clearing the WIP on a job ensure that you have setup the correct details for the write off. You can decide if you want the zero value invoice to be processed against the customer associated with the job or to a specific customer.
To set the default customer select Tools\Options and select Jobs. Select either "Use Job Customer" or "Use This Customer" under the Clear WIP Invoice Customer option.
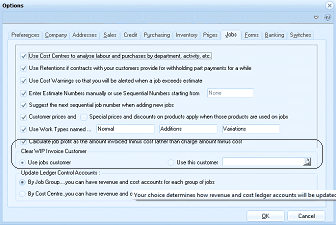
The "Options" dialog window is displayed showing the "Jobs" tab (one of many tabs including Preferences, Company, Addresses, Sales, Credit, Purchasing, Inventory, Pages, Jobs, Forms, Banking, and Switches). The Jobs tab contains multiple settings checkboxes and options. Visible checkboxes include "Use Cost Centres to analyse labour and purchases by department, activity, etc.", "Use Retentions if contracts with your customers provide for withholding part payments for a while", "Use Cost Warnings so that you will be alerted when a job exceeds estimate", "Enter Estimate Numbers manually or use Sequential Numbers starting from" (with a text field showing "None"), "Suggest the next sequential job number when adding new jobs", "Customer prices and Special prices and discounts on products apply when those products are used on jobs", and "Use Work Types named" (showing "Normal", "Addons", "Variations"). Under "Clear WIP Invoice Customer" there are two radio button options: "Use job customer" and "Use this customer" (with a field for specifying the customer). Below that is an "Update Ledger Control Accounts" section with options "By Job Group, you can have revenue and cost accounts for each group of jobs" and "By Cost Centre, you can have revenue and cost accounts". OK and Cancel buttons are at the bottom.
You can then select the Job you wish to clear the WIP and select the Button "Clear WIP"
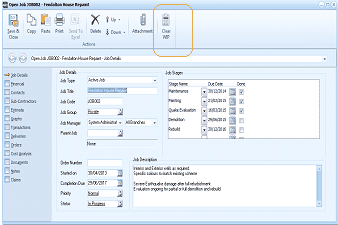
The "Open Job" dialog window is displayed showing the "Job Details" tab for the "Fendelton House Request" job. The window has a toolbar with buttons including Save & Close, Copy, Paste, Print, Send To, Delete, and Attachment, plus a "Clear WIP" button that is highlighted with an orange/yellow box outline to indicate its location. The left side shows navigation tabs for Job Details, Financial, Sub-Contractors, Estimate, Graphs, Transactions, Deliveries, Orders, Cost Analysis, Notes, and Documents. The main area shows job detail fields including Job Type (Active Job), Job Title, Job Code (JOB002), Job Group (System Administrator - All Entities), and Job Manager. The "Job Stages" grid on the right shows stages including Repairs, Painting, Decoration, and Demolition with due dates and completion percentages. A "Job Description" text area describes the job. This image highlights the "Clear WIP" button in the toolbar that users click to initiate the WIP clearing process.
This will then bring up a screen which will allow you the enter any details relating to the write off.
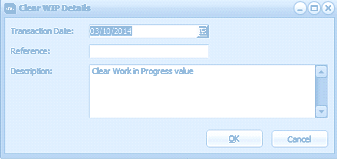
The "Clear WIP Details" dialog box is displayed as a small popup window. It contains three fields: "Transaction Date" (showing a date with a calendar picker button), "Reference" (an empty text field for entering a reference), and "Description" (showing "Clear Work in Progress value" as default text). At the bottom of the dialog are "OK" and "Cancel" buttons. This dialog allows users to enter the details for the WIP write-off transaction before processing.