Setting up Sub-Accounts
Setting up Sub-Accounts
Ledger Accounts Sub-accounts can be used to record costs for different branches, activities or cost centres. For example, you might want to use "Sydney" as a branch (Sub-Account 1) and "Sales" as a cost centre (Sub-Account 2). Therefore, you might then allocate cost such as 'Telephone' to: 'Telephone-Sydney-Sales'. If you want to give each sub-account a title, you must do so when setting up the company in the Ledger section of the New Company Wizard.
To set up a new Sub-Account:
-
Select Accounts in the Folders List, then select the name you have given your first sub-account in the company setup phase. A list of existing sub-accounts will appear.
-
Select** New** on the menu bar at the top of the screen:
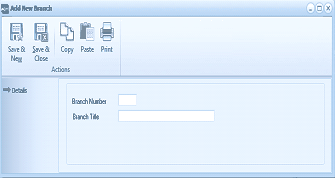
The "Add New Branch" dialog box with a toolbar at the top containing Save & New, Save & Close, Copy, Paste, and Print buttons under an "Actions" section. The main area shows a "Details" section with two fields: "Branch Number" (a short text input field for the two-character code) and "Branch Title" (a longer text input field for the full sub-account name). Both fields are empty and ready for input.
Add New Branch
Details
- Branch/Activity Number: This is a two-character code, which will be used to identify the branch in ledger account codes.
- Branch/Activity Title: Enter here the full sub-account name, as it is to appear in reports. Save Settings
- Save & Close: To add the new sub-account, select 'Save and Close' at the top of the screen.
- Save & New: To save the new sub-account and add another sub-account, select 'Save & New' at the top of the screen.