Importing Journals
Importing Journals
You can import journals from an Excel file and update Ledger accounts
To Import a Journal:
-
Select Accounts in the main screen and a list of sub-categories will appear.
-
Select Journal in the list of sub-categories and a list of existing journal entries will appear:
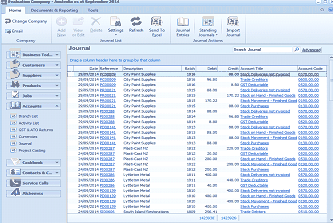
The ABM main screen showing the "Journal" list view within the Accounts section. The left panel shows the folder navigation tree with Business Tools, Customers, Suppliers, Products, Accounts (expanded), Branch List, and other categories. The main area displays a list of journal entries in a table with columns including Date, Reference, Description, Debit, Credit, and other transaction details. The toolbar at the top shows options for Email, Add, New, Delete, Settings, Refresh, Send To Excel, Journal Entries, Standing Journals (with sub-menu), and Import Journals. Multiple journal entry rows are visible with various dates, references, and amounts.
List of Journal Entries
-
In the Journal Transactions menu bar, select Import Journals and the Import Journal screen will appear:
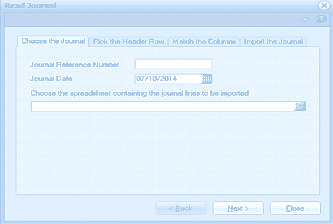
The "Read Journal" import wizard dialog showing the first tab "Choose the Journal" (one of four tabs: Choose the Journal, Pick the Header Row, Match the Columns, Import the Journal). The form contains fields for "Journal Reference Number" (empty text field), "Journal Date" (showing "07/10/2014" with a calendar picker button), and a field to "Choose the spreadsheet containing the journal lines to be imported" with a file browse button. Navigation buttons at the bottom include Back, Next, and Close.
-
Enter the information relating to the file you wish to import.
-
Journal Reference: Enter a reference number relating to this journal.
-
Journal Date: Enter the transaction date. This date can be either in the current or previous period.
-
File to be Imported: Enter the path and file name containing the journal entries you wish to import.
-
Pick the Header Row.
Select the row that contains the heading of the file you wish to import.
-
Match the Columns. Select the columns that contain the relevant information
-
The Account Code: Select the column that contains the Ledger code from the drop-down list.
-
The Amount: Select the column that contains the amount to be imported.
-
Description: Select the Column that contains the narrative you wish to use for the journal.

The "Read Journal" import wizard dialog showing the "Match the Columns" tab. The screen instructs the user to "Select below the spreadsheet column which contains:" and provides four dropdown fields for column mapping: "The Account Code" (mapped to "Account Code"), "The Amount" (mapped to a selected column shown in a dropdown), "The Description" (mapped to "Description"), and "The Batch Number" (mapped to "Batch"). Navigation buttons at the bottom include Back, Next, and Close.
Column Selection:
- Import the Journal:
- Check the spreadsheet for errors: You can check the spreadsheet to ensure there are no errors prior to importing the file.
- Create the Journal: When you are satisfied that all the line items in the spreadsheet are correct you can create the journal and ABM will be updated accordingly.