Assigning Queues to Forms
Assigning Queues to Forms
You can select any form and assign it to a Queue by selecting File from the Business Today menu, and selecting Printer & Forms Settings see Printer and Forms Settings
When you create a new form, or edit an existing form, the following screen will appear.
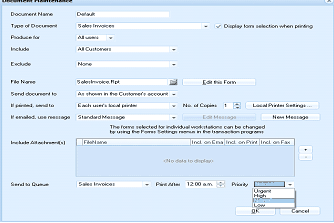
ABM Document Maintenance dialog box showing queue assignment settings for a form. Fields include: Document Name ("Default"), Type of Document ("Sales Invoices"), "Display form selection when printing" checkbox, Produce For ("All users"), Include ("All Customers"), Exclude (None), File Name ("SalesInvoice.Rpt" with "Edit this Form" button), Send document to ("As shown in the Customer's account"), If printed send to ("Each user's local printer" with No. of Copies: 1 and "Local Printer Settings" button), If emailed use message ("Standard Message" with "Edit Message" and "New Message" buttons). A notice about changing forms for individual workstations is shown. The Include Attachments section has columns for FileName and checkboxes for Incl. on Email, Incl. on Print, and Incl. on Fax. At the bottom, the Send to Queue dropdown shows "Sales Invoices" selected, Print After shows "12:00 a.m.", and Priority dropdown shows "Urgent" selected. OK and Cancel buttons appear at the bottom right.
To set up the queue you need to follow the steps below
- Send Queue To: Select the queue from the drop down list (the list will display all queues that have been set up).
- **Print After: **Select the time you wish these documents to be processed.
- Priority: You can set a priority for the printing of these forms. Therefore, if you set the priority to Urgent, then when the print time is reached, the Document Server will print all documents with the highest priority first, irrespective of when other documents have been added to the queue.
**Include Attachments: **You can include a static attachment with all the documents going to a particular queue by selecting + sign next to the "Include attachments" box and select a PDF file you wish to attach. Once the file is selected, you can determine if this attachment is to be sent with documents being sent by Email/Print or Fax. Example: If you want to send a new price list to all your customers, you could attach a PDF file with the new prices when any invoice is processed.