Printer and Form Settings
Printer and Form Settings
When you initially install ABM, default forms will already be set up, and the printer settings will be set up for your default printer. You can change the Printer and Forms by selecting "Printer & Forms Settings" from the menu. Select documents and Reporting and select Printer & Form Settings. The following screen will appear.
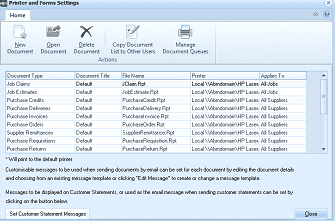
ABM Printer and Forms Settings screen. The toolbar at the top shows buttons for New Document, Open Document, Delete Document, Copy Document List to Other Users, and Manage Document Queues under the Home tab. Below is a grid listing all configured document types with columns: Document Type, Document Title, File Name, Printer, and Applies To. Documents listed include Job Claims, Job Estimates, Purchase Credits, Purchase Deliveries, Purchase Invoices, Purchase Orders, Supplier Remittances, Purchase Requisitions, Purchase Returns, and Purchase Fixtures. Each shows "Default" as the Document Title, form filenames (e.g., "JClaim.Rpt", "JobEstimate.Rpt"), printer paths (e.g., "Local \VAbmdomain\HP LaserJet..."), and "All Suppliers" or "All Jobs" in the Applies To column. A note states "* Will print to the default printer." Below the grid is text about customizable messages for email and a "Set Customer Statement Messages" button.
Printer & Forms Settings.
Options Available:
- New Document: If you have registered Advanced Document Handling, you can add new document types to suit different needs of the business. See Adding New Documents
- Open Document: You can change the Form settings by selecting the required Form, and selecting Open Document. This will allow you to change the selected physical form, as well as the printer. You can also set the number of copies required. If you have registered Advanced Document Handling, you can change the printing parameters of the document. Example: If you wish to have the document only printed for a specific group of customers, then you can select Applies To. See Maintaining Existing Documents
- Delete Document: If you wish to remove a document, then select the required form and select Delete.
- Copy Document List to All Users: If you have set up new forms, you can then copy all these new forms to other users, so that they are available throughout the organization.
**Form Settings: **The settings for the forms can be changed by selecting Tools\Options\Forms.
a. Forms Folder: Select the default folder for your forms. Note if a form is placed in a different folder to the default folder you will need to specify this form in Printer and Forms Settings.
b. Mailing Address: Enter the address you wish to have printed on the form.
c. Optional form Fields: You can enter additional information which will be printed on the form. Note these fields are specific to that company, therefore, different information can be added for each company.
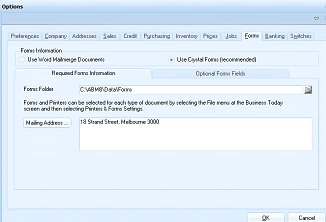
ABM Options dialog showing the Forms tab. The top of the dialog has tabs for Preferences, Company, Addresses, Sales, Credit, Purchasing, Inventory, Pages, Jobs, Forms, Banking, and Spellings. Within the Forms tab, there are radio buttons for "Use Word Mailmerge Documents" and "Use Crystal Forms (recommended)" with the Crystal option selected. Sub-tabs show "Required Forms Information" and "Optional Forms Fields." The Forms Folder field shows the path "C:\ABM00\Data\Forms". A note explains that forms and printers can be selected for each type of document by selecting the File menu at the Business Today screen and then selecting Printer & Forms Settings. The Mailing Address field shows "18 Strand Street, Melbourne 3000". OK and Cancel buttons are at the bottom.
-
Logo Picture File: You can place you logo on the form by selecting your logo file. The logo needs to be a BMP file. If no logo is specified then the form will not print any logo.
-
Conditions of Sale: If you wish to show conditions of sale on your forms you can enter that information here.
-
Email Remittance To: If you wish to display an email address for which remittances should be sent to you can enter that email address here. This will only appear on sales forms.
-
Fax Remittance To: If you wish to display an fax number for which remittances should be sent to you can enter that fax number here. This will only appear on sales forms.
-
Transfer Payments to: If you want your customers to transfer payments to your bank you can enter your bank information here. Example ABC Bank, Bank Code 123-456, Account Number 654321
-
Payment Reference: If you want your customers to specify a reference when sending a remittance then select either Customer Code, Invoice Number or Not Required.