Relevant Contracts Tax (RCT)
Relevant Contracts Tax (RCT)
Relevant Contracts Tax
If your company is making payments to sub-contractors, and are engaged in the construction, meat or forestry industry then these payments will be subject to authorisation by the Revenue Commissioners.
Principal Tax Number:
Select Tools\Options\Company and enter your Principal Tax Number. This is the registration number supplier by the Revenue Commissioners for your RCT tax registration.
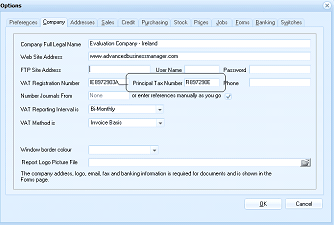
The "Options" dialog window with the "Company" tab selected. The tabs across the top include: Preferences, Company (active), Addresses, Sales, Credit, Purchasing, Stock, Pages, Jobs, Forms, Banking, and Systems. The Company section shows fields for: Company Full Legal Name (showing "Evaluation Company - Ireland"), Web Site Address, FTP Site Address (with User Name and Password fields), VAT Registration Number (showing an Irish VAT number), Principal Tax Number (with a separate field showing "R" prefix, used for RCT registration), Number Journals From (with "or enter references manually as you go" option), VAT Reporting Intervals (set to "Bi-Monthly"), VAT Method (set to "Invoice Basis"), Window border colour, and Report Logo Picture File. A note at the bottom states the company address, logo, email, fax and banking information is required for documents and is shown in the Forms page. OK and Cancel buttons are at the bottom.
Supplier Setup
You will need to indicate that the supplier is a sub-contractor and is subject to RCT rules. See Supplier Accounts - Account Details
Setup RCT
In order to connect to the Revenue Web Service you need to setup you ROS (Revenue Online Service) certificate. Select any supplier that you have setup as RCT rules apply and select the Contracts folder, then select New Contract and select RCT Setup.
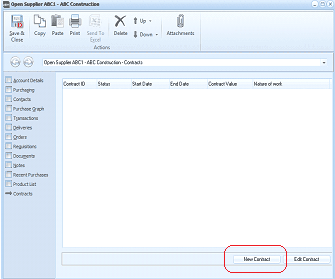
The "Open Supplier ABC1 - ABC Construction" screen in ABM showing the Contracts tab. The toolbar shows Save & Close, Copy, Paste, Print, Send To, Delete, Down, and Attachments buttons. The left navigation panel lists tabs: Account Details, Purchasing, Addresses, Purchase Graph, Transactions, Orders, Regulations, Discounts, Documents, Recent Purchases, Product List, and Contracts (currently selected). The main area displays a contracts grid with columns: Contract ID, Status, Start Date, End Date, Contract Value, and Nature of work. The grid is currently empty. At the bottom are two buttons: "New Contract" (highlighted with a red circle) and "Edit Contract".
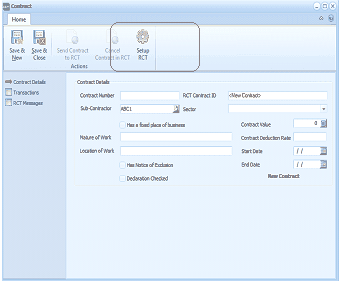
The "Contract" screen in ABM for entering RCT contract details. The toolbar shows Save & New, Save & Close, Send Contract to RCT, Cancel Contract in RCT, and Setup RCT buttons under "Home" and "Actions" sections. The left navigation panel has three items: Contract Details (selected), Transactions, and RCT Messages. The main area shows "Contract Details" fields including: Contract Number, RCT Contract ID (showing "New Contract"), Sub-Contractor (showing "ABC1"), Sector (dropdown), "Has a fixed place of business" checkbox, Contract Value (set to 0), Contract Deduction Rate, Nature of Work, Location of Work, Start Date, End Date, "Has Notice of Exclusion" checkbox, "Declaration Checked" checkbox, and a "New Contract" label. SIN-related fields are also visible.
When you select the RCT setup the following screen will appear.

The "Setup RCT Options" dialog window. It contains the following fields: "Path to RCT Certificate File" (showing a file path "C:\ROS\RosCerts\ABMTest.p12"), "Certificate Password" (showing masked password characters), and a "Connect to RCT Public Test Service" checkbox (unchecked). At the bottom are "Update" and "Cancel" buttons.
- Path to RCT: You can browse for the certificate file that you have received from the Revenue Commissioners when you setup your ROS system.
- Certificate Password: Enter the password you use to log onto your ROS system for the certificate selected.
- Connect to RCT Public Test: Do not select this option as this will only be used by the installer of your system to test the connection.
Note: The above information needs to be setup for each user who will be adding or updating contracts or making payments to sub-contractors.
New Contracts:
Once you have signified that the RCT rules apply for the supplier, and you have entered a correct Tax Certificate number, you can now add new contracts for each sub-contractor.
To add a new contract, select the contracts folder on the supplier account, and select New Contract.
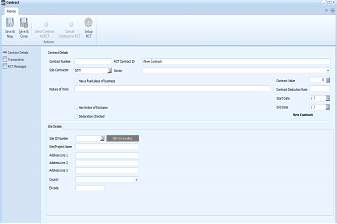
The "Contract" screen in ABM for entering a new RCT contract. The toolbar shows Save & New, Save & Close, Send Contract to RCT, Cancel Contract in RCT, and Setup RCT buttons. The left navigation panel shows Contract Details (selected), Transactions, and RCT Messages. The main "Contract Details" area displays fields: Contract Number, RCT Contract ID (showing "New Contract"), Sub-Contractor, Sector (dropdown), "Has a fixed place of business" checkbox, Contract Value, Contract Deduction Rate, Nature of Work, "Has Notice of Exclusion" checkbox, "Declaration Checked" checkbox, Start Date, End Date, and a "New Contract" indicator. Below is a section for site information with fields: Site ID Number (SIN Number) with a "New Project" button, Project Name, Address Lines 1-3, County (dropdown), and Eircode.
- Contract Number: This is an internal number and you can enter a reference number to identify the contract.
- RCT Contract ID: This will be automatically updated when you synchronise the contract with the ROS system. Note: If you have contracts already setup on the ROS system then you can enter relevant ID that is associated with that contract.
- Sub-Contractor: The sub-contractor's account number will appear here automatically.
- Sector: Select the appropriate industry sector from the drop down list.
- Has fixed place of business: Select this option if the sub-contractor has a fixed business address.
- Contract Value: Enter the value of this contract.
- Nature of Work: Enter the nature of the work being done.
- Start Date: Enter the date when the contract started.
- End Date: Enter the date that the contract is to finish.
- Declaration Checked: Select this item before sending the contract to RCT.
- Site Identification Number (SIN Number): If the contract relates to an existing project then you can use the finder to select and existing SIN number. If you select an existing project then the SIN number field together with the project name and address fields will be automatically populated. However, if the contract relates to a new project then you will need to enter the details as follows:
- Project Name: The name of the project.
- Address Lines 1 to 3 (at least Address line 1 needs to be entered. Address lines 2 and 3 are optional)
- County: The county must be selected from the drop down list.
- Eircode: If you know the Eircode this can be entered here
- When you select Save or select Send Contract to RCT, and if the information is correct, the Revenue Web Service will return the SIN number and update the contract details. The SIN number field will then show SIN Verified
Send Contract to RCT: when you have finished entering all the details you should select Send contract to RCT in order to synchronise with the ROS system.
Save and Close: Select save and close to save the contract details and exit.
Save and New: Select save and new to save the details of the contract and add a new contract.
Viewing Contracts:
If you wish to view details on any contract, then select the appropriate suppler and select the contracts folder. you can then select a particular contract and select Edit Contract
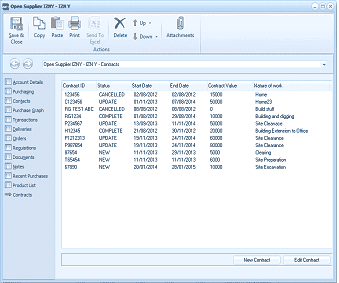
The "Open Supplier E2NY - E2N Y" screen in ABM showing the Contracts tab. The toolbar shows Save & Close, Copy, Paste, Print, Send To, Delete, Down, and Attachments buttons. The left navigation panel lists tabs: Account Details, Purchasing, Contacts, Addresses, Purchase Graph, Transactions, Orders, Regulations, Discounts, Documents, Recent Purchases, Product List, and Contracts (selected). The main area displays a contracts grid with columns: Contract ID, Status, Start Date, End Date, Contract Value, and Nature of work. Multiple contract rows are listed with various statuses (CANCELLED, UPDATE, COMPLETE, NEW) and contract values ranging from 1000 to 6000, with descriptions like "Building and digging", "Building Extension to Office", "Site Clearance", "Site Preparation", and "Site Excavation". At the bottom are "New Contract" and "Edit Contract" buttons.
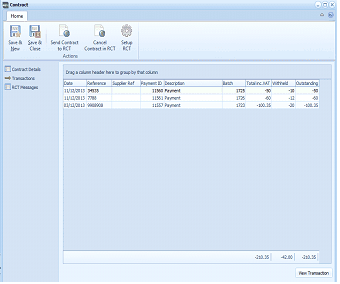
The "Contract" screen in ABM showing the Transactions tab for an existing contract. The toolbar shows Save & New, Save & Close, Send Contract to RCT, Cancel Contract in RCT, and Setup RCT buttons under "Home" and "Actions" sections. The left navigation panel shows Contract Details, Transactions (selected), and RCT Messages. The main area displays a data grid with columns showing transaction details: dates (11/12/2013, 11/12/2013, 03/12/2013), reference numbers, Contract ID, Description (showing "31360 Payment", "1353 Payment", "1357 Payment"), Batch, Balance Amt, Withheld, and Outstanding amounts. Totals are displayed at the bottom of the grid showing summary amounts. A "View Transaction" button appears at the bottom right.
When you have edited the contract, you can either view the details of the contract, view payments processed for this contract, or view any message received from the Revenue Web Service.
Paying Sub-Contracts:
When you are processing a payment for a sub-contractor, select supplier payments in the normal way (see Supplier Payment ), and select the invoice or invoices you wish to pay (or enter an amount if no specific invoices are being paid). When you select Save and New or Save and Close, then a pop-up screen will appear requesting you to select a contract relating to this payment. Select the relevant contract and select ok. This will then synchronise with the Revenue Web Service and authorise the payment. The Revenue Web Service will advise on the amount of withholding tax if any to be deducted. The amount of withholding tax if any together with the net amount to be paid will be returned to the supplier payments screen and the payment will be processed.