Branches
Branches
If your business is run from different entities throughout the country, or the World, then you can set up Branches to control these different entities. Branches can cover different product locations. Example: if you have an office in the North of the country which has three warehouses, and an office in the South of the Country with two warehouses, then you could set up a branch for North and set up three product locations for each warehouse all associated with the North Branch.
To Set Up Branches:
From the main tool bar select Tools and Select Branches
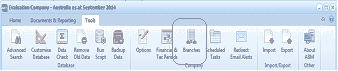
The ABM main toolbar showing the "Tools" ribbon tab. Visible buttons include Advanced Search, Customize, Data Remove, Data Backup, Options, Financial & Tax Periods, Branches, Scheduled Tasks, Import/Export, and other tool icons. The "Branches" button is highlighted in the toolbar, located in the Tools section.
This will open up the following screen
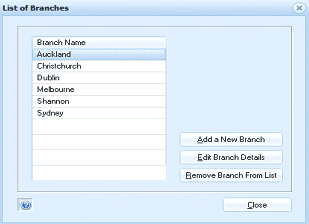
The "List of Branches" dialog box displaying a list of existing branch names in a table, including Auckland, Christchurch, Dublin, Melbourne, Shannon, and Sydney. To the right of the list are buttons: "Add a New Branch", "Edit Branch Details", and "Remove Branch From List". A "Close" button appears at the bottom right of the dialog.
From this screen you Add or Edit a Branch.
Add New Branch
To add a new branch select Add New Branch and the following screen will appear:
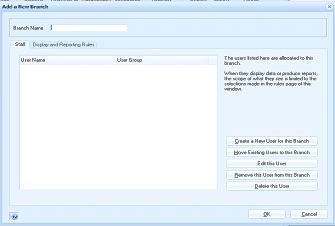
The "Add a New Branch" dialog box with a "Branch Name" text field at the top. Below are two tabs: "Staff" and "Display and Reporting Rules". The Staff tab is currently selected, showing a table with columns for "User Name" and "User Group" (currently empty). To the right is explanatory text stating that listed users are allocated to this branch and that their displayed data will be limited to the selections made on the rules page. Below the table are buttons: "Create a New User for this Branch", "Move Existing Users to this Branch", "Edit this User", "Remove this User from this Branch", and "Delete the User". OK and Cancel buttons are at the bottom.
Firstly you will need to supply the name for this branch, and then you will be presented with two options as follows.
- Assign staff to this branch. you will need to assign the staff that will have access to the information relating to this branch. You can restrict staff to have the ability to view information for that branch or all branches. To assign staff select
- Move Existing Users to this Branch: This will give you a list of the users which have already been set up for you system and you can select the appropriate users.** Note: **The system administrator will not be available for selection as the system manager will have access to all branches.
- Create a New User for this Branch: This will allow you to add a new user and automatically assign to this branch. See setting up users and groups
- Remove the User from this Branch: If you have incorrectly added a user to a branch or the user is no longer associated with this branch then you can remove that user.
- Delete this User: If the user is no longer associated with the company you can delete the user. Warning: The user name will be permanently deleted.
Display and Reporting Rules
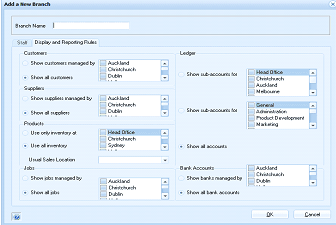
The "Add a New Branch" dialog showing the "Display and Reporting Rules" tab. The dialog contains several sections for controlling branch visibility: "Customers" section with "Show customers managed by" dropdown lists showing branch names (Auckland, Christchurch, Dublin) and a "Show all customers" checkbox; "Suppliers" section with "Show suppliers managed by" dropdowns and "Show all suppliers" checkbox; "Products" section with "Only use inventory at" dropdown showing "Head Office" and "Use all inventory" checkbox, plus an "Unsold Sales Location" dropdown; "Jobs" section with "Show jobs managed by" dropdowns and "Show all jobs" checkbox. On the right side are "Ledger" options with "Show sub-accounts to" listing Head Office, Auckland, Melbourne and "Show all sub-accounts" listing General, Product Development, Marketing; and "Bank Accounts" section with "Show bank accounts managed by" listing Auckland, Christchurch, Dublin and a "Show all bank accounts" checkbox. OK and Cancel buttons appear at the bottom.
You can decide what a users associated with this branch can see and report on for each branch.
- Show Customers managed by: You can allow the users to see details of customers for a particular branch, or branches by selecting the particular branch, or branches, or you can allow the users to see all customer at all branches. See assigning a branch to a customer/supplier/job below.
- Show Suppliers managed by: You can allow the users to see details of suppliers for a particular branch, or branches by selecting the particular branch, or branches, or you can allow the user to see suppliers relating to all branches. See assigning a branch to a customer/supplier/job below.
- Show Jobs managed by: You can allow the users to see details of jobs for a particular branch, or branches by selecting the particular branch, or branches, or you can allow the user to see all jobs for branches. See assigning a branch to a customer below.
- Ledger: You can decide is the users can see all ledger accounts (provided the appropriate security is in place) or you can restrict the user to seeing sub-accounts relating to ledger accounts.
- Bank Accounts: If you wish to restrict the users to only see and select bank accounts for a particular branch, or branches you can select the required branch or branches or you can allow the user to see all bank accounts for all branches.
**Assigning Customer/Supplier/Jobs to Branches. **If you wish to have customers/suppliers/job restricted to a particular branch, or branches then you can assign that branch to the customer/supplier/job.
When adding or editing a customer/supplier/or job there is a drop down list of the branches that you can assign the customer/supplier/job to or you can assign that customer/supplier/job to be available and visible for all branches. (See Setting up Customer Accounts, Setting Up Supplier Accounts, Setting Up Jobs).
If you assign a branch to a customer then that branch (and users in that branch) can view details of that customer and process transactions for that customer.
Processing Transactions:
When users associated with a particular branch are processing transactions then only the customers/suppliers/jobs and locations that are associated with that branch are available for selection. **Example: **When a user in South Branch processes a sales order that user will only have the customers available that have been allocated to that branch (or customers who are allowed to all branches). when the user then selects a product the available locations from which the products can be taken from will be restricted to the locations associated to that branch.